necklaces length guide

Mastering layered necklaces involves balancing lengths‚ textures‚ and pendants for a cool style. Layered necklaces are a must-have‚ offering elegance‚ creativity‚ and individuality.

Navigating the world of necklaces extends beyond simply choosing a beautiful design; understanding necklace lengths is crucial for achieving a flattering and balanced look. A necklace’s length dramatically impacts how it sits on your neckline‚ influencing your overall silhouette and complementing your outfit. From delicate chokers to dramatic statement pieces‚ each length serves a unique purpose and pairs best with specific necklines.

Selecting the right length isn’t just about aesthetics; it’s about personal comfort and showcasing the necklace’s features effectively. Whether you’re layering delicate chains or opting for a single‚ bold pendant‚ knowing the standard lengths – 14‚ 16‚ 18‚ 20‚ 22 inches and beyond – empowers you to make informed choices. This guide will demystify these measurements‚ helping you confidently select necklaces that enhance your style and flatter your figure. Consider height‚ neck length‚ and the desired visual impact when choosing a length.

Ultimately‚ the perfect necklace length is a personal preference‚ but understanding the basics will unlock a world of styling possibilities‚ allowing you to express your individuality with confidence.

Understanding Common Necklace Lengths

Standard necklace lengths typically range from 14 to 24 inches‚ with each increment offering a distinct visual effect. A 14-inch necklace‚ known as a choker‚ sits snugly at the base of the neck‚ creating a bold statement. 16-inch necklaces‚ or collars‚ rest just above the collarbone‚ ideal for showcasing a pendant or delicate design. The universally flattering 18-inch length falls at the collarbone‚ offering versatility with various necklines.

Moving up‚ a 20-inch (matinee) necklace sits a few inches below the collarbone‚ working well with lower necklines. 22-inch (opera) lengths are long enough to layer or wear doubled‚ adding drama and sophistication. Finally‚ 24-inch and longer necklaces‚ often called statement lengths‚ create a visually striking effect‚ pairing beautifully with simple outfits.

These lengths aren’t rigid rules‚ but rather guidelines. Factors like your body type and the necklace’s design influence the overall look. Visualizers can help determine the best length for your unique proportions‚ ensuring a harmonious and stylish result.

14-Inch Necklace: Choker Length

The 14-inch necklace‚ universally recognized as a choker‚ makes a bold and immediate statement. It sits high on the neck‚ closely embracing the base‚ creating a focal point that draws attention to the face and neckline. Historically popular in various eras‚ the modern choker has evolved from simple bands to elaborate designs incorporating beads‚ pendants‚ and intricate metalwork.

This length is particularly effective with higher necklines like turtlenecks or off-the-shoulder tops‚ offering a striking contrast. However‚ it’s crucial to consider body type; those with shorter necks might find a choker visually constricting. A delicate choker can elongate the neck‚ while a wider design adds a dramatic flair.

Chokers are versatile‚ ranging from casual everyday wear to elegant evening accessories. When choosing a 14-inch necklace‚ prioritize comfort and ensure a secure yet not overly tight fit. It’s a classic choice for expressing personal style and adding a touch of edgy sophistication.

16-Inch Necklace: Collar Length

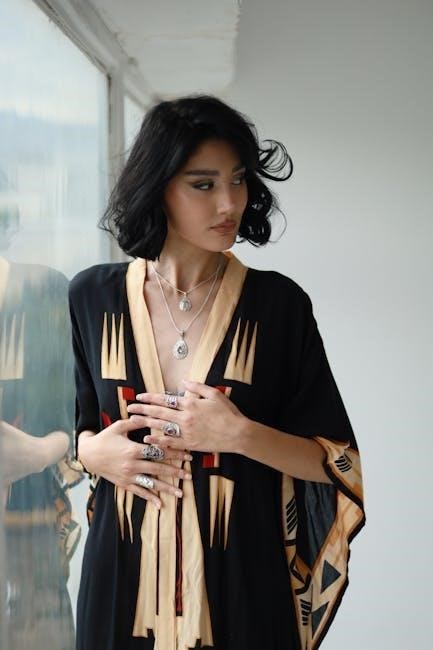
The 16-inch necklace‚ often referred to as a collar necklace‚ rests comfortably at the base of the neck‚ slightly below a traditional choker. This length is incredibly flattering on most individuals‚ offering a balanced and versatile look that complements a wide range of necklines and outfits. It’s a classic choice for everyday wear‚ adding a subtle touch of elegance without being overly dramatic.

Unlike the bolder statement of a choker‚ the 16-inch length allows for more pendant play. It’s an ideal length to showcase delicate pendants or small charms‚ drawing attention to the décolletage. This length pairs beautifully with scoop necks‚ boat necks‚ and even crew necks‚ softening the lines and adding visual interest;

When selecting a 16-inch necklace‚ consider the width and style. A delicate chain works well for a minimalist aesthetic‚ while a bolder chain can make a more pronounced statement. It’s a foundational piece for any jewelry collection‚ offering endless styling possibilities.

18-Inch Necklace: The Most Versatile Length

The 18-inch necklace is widely considered the most versatile length‚ and for good reason. It sits just below the collarbone‚ making it exceptionally adaptable to various necklines and styles. This length works beautifully with everything from casual t-shirts to elegant evening gowns‚ seamlessly transitioning from day to night.

Its placement allows it to be worn with V-necks‚ scoop necks‚ crew necks‚ and even turtlenecks‚ enhancing the overall look without overpowering it. The 18-inch length is also perfect for layering with shorter or longer necklaces‚ creating a personalized and on-trend aesthetic. It provides a fantastic canvas for showcasing pendants of various sizes and designs.

Because of its adaptability‚ an 18-inch necklace is an excellent starting point for building a jewelry wardrobe. It’s a classic and timeless choice that will remain stylish for years to come‚ offering endless styling options and complementing a diverse range of personal styles.

20-Inch Necklace: Matinee Length

The 20-inch necklace‚ often referred to as the matinee length‚ gracefully falls between the collarbone and the bustline; This length offers a sophisticated and noticeable presence‚ making it ideal for pairing with open necklines or wearing over sweaters and blouses. It’s a fantastic choice for adding a touch of elegance to both casual and more formal outfits.

Matinee length necklaces work particularly well with lower V-necks‚ scoop necks‚ and button-down shirts‚ filling the space and drawing attention to the décolletage. They also complement higher necklines by adding a layered effect when worn over clothing. This length is versatile enough to showcase bolder pendants or delicate chains‚ depending on the desired look.

For those seeking a statement piece that isn’t overly dramatic‚ the 20-inch necklace strikes the perfect balance. It’s a classic length that provides ample opportunity for self-expression and complements a wide range of personal styles‚ making it a valuable addition to any jewelry collection.

22-Inch Necklace: Opera Length

The 22-inch necklace‚ known as the opera length‚ is a dramatic and elegant choice‚ typically falling several inches below the collarbone. Historically‚ this length was designed to be worn with opera gowns‚ hence the name‚ allowing the necklace to drape beautifully over the bustline. Today‚ it remains a sophisticated option for both formal events and adding a touch of glamour to everyday wear.

Opera length necklaces are incredibly versatile. They can be worn as a single strand for a classic look‚ or doubled for a shorter‚ more layered effect. This adaptability makes them a valuable addition to any jewelry collection. They pair exceptionally well with lower necklines‚ such as deep V-necks or plunging tops‚ enhancing the overall silhouette.

Consider a statement pendant or a strand of pearls with this length to truly showcase its potential. The 22-inch necklace offers a refined and timeless aesthetic‚ perfect for those who appreciate a touch of old-world charm and modern sophistication.

24-Inch & Longer: Statement Lengths

Necklaces measuring 24 inches and beyond fall into the category of statement lengths‚ designed to command attention and make a bold fashion statement. These necklaces typically hang well below the bustline‚ offering a dramatic and visually striking effect. They are perfect for those who love to express their individuality and aren’t afraid to embrace a more flamboyant style.

Longer necklaces offer incredible versatility in styling. They can be looped multiple times to create a layered look‚ knotted for a unique twist‚ or worn as a single‚ flowing strand. They work particularly well with simple outfits‚ adding a focal point and elevating the overall aesthetic. Consider pairing them with high necklines or dresses to create a contrasting and eye-catching look.

Statement necklaces often feature large pendants‚ bold beads‚ or intricate designs; They are ideal for special occasions or for adding a touch of glamour to everyday wear‚ truly showcasing a personal style.

Necklace Length and Neckline Compatibility

Selecting the right necklace length is crucial for complementing your outfit’s neckline. A harmonious pairing enhances your overall look‚ while a mismatched combination can feel unbalanced. Understanding these relationships allows you to create a polished and stylish appearance effortlessly.

The goal is to ensure the necklace doesn’t compete with the neckline but rather enhances it. For instance‚ higher necklines benefit from longer necklaces that create a lengthening effect‚ while lower necklines can accommodate shorter‚ more delicate chains. Consider the pendant size as well; a larger pendant might overwhelm a delicate neckline.

Careful consideration of these factors will elevate your style. Choosing the correct length and style will ensure your necklace becomes a beautiful accent‚ rather than a distracting element‚ completing your ensemble with grace and sophistication.

V-Necklines

V-necklines are incredibly versatile‚ but necklace choices require careful consideration. A pendant necklace that mirrors the “V” shape of the neckline is a classic and flattering option. The pendant’s lowest point should ideally rest a couple of inches below the neckline’s point‚ creating a visually pleasing symmetry.

Shorter V-necks (more modest) pair well with 16-18 inch necklaces‚ while deeper V-necks can handle longer lengths‚ such as 20-24 inches. Avoid necklaces that fill the entire space within the “V‚” as this can look cluttered. A delicate chain with a small pendant is often the most elegant choice.

Layering is also possible with V-necks; a shorter‚ delicate chain combined with a longer pendant necklace can add depth and interest. However‚ ensure the layers don’t overwhelm the neckline or compete for attention. The key is balance and proportion.

Crew Necklines

Crew necklines‚ being round and close to the collarbone‚ offer a fantastic canvas for necklaces. A classic choice is an 18-inch necklace‚ as it sits comfortably within the neckline’s curve without feeling too restrictive or overwhelming. This length works particularly well with simple pendants or delicate chains.

For a more statement-making look‚ a 20-inch matinee length can also complement a crew neck‚ especially if the necklace features bolder elements. However‚ avoid necklaces that are too long‚ as they may hang below the neckline and appear disjointed.

Layering with crew necks is effective; combine a shorter‚ 16-inch choker with an 18-inch pendant necklace. This creates visual interest without overcrowding the area. Consider the pendant size – smaller pendants work best for layering‚ ensuring a harmonious and balanced appearance. Avoid bulky or overly ornate necklaces that clash with the simplicity of the crew neck.

Scoop Necklines

Scoop necklines‚ with their wider‚ U-shape‚ provide more versatility in necklace choices. An 18-inch necklace is a universally flattering option‚ gracefully filling the space created by the neckline without being overly prominent. This length allows the pendant to sit nicely above the dip of the scoop.

For a bolder statement‚ a 20-inch matinee length can work beautifully‚ especially with larger pendants or more elaborate designs. The longer length complements the openness of the scoop neckline‚ creating a balanced look; However‚ avoid excessively long necklaces that might get lost against the fabric.

Layering is also effective with scoop necks. Pair a delicate 16-inch chain with an 18 or 20-inch pendant. This adds depth and dimension. Consider the necklace’s style; a V-shaped pendant can echo the neckline’s shape‚ enhancing the overall aesthetic. Ensure the necklaces don’t compete with the neckline’s curve.

Off-the-Shoulder Necklines

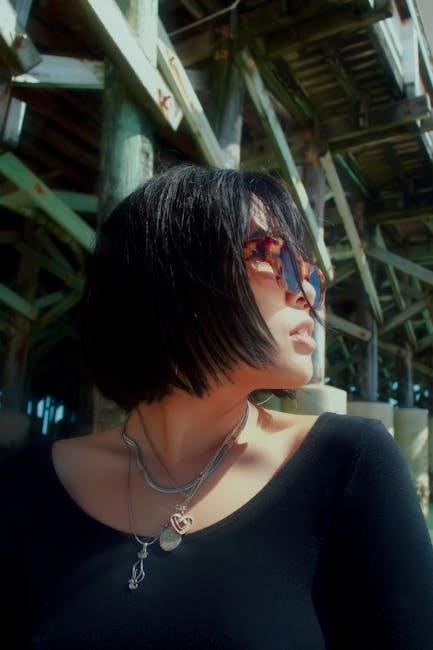
Off-the-shoulder necklines showcase the collarbone and shoulders‚ demanding necklaces that enhance this feature. A 16-inch collar necklace sits perfectly‚ accentuating the neckline’s curve without overwhelming it. This length draws attention to the exposed skin and creates a balanced silhouette.

For a more dramatic effect‚ consider an 18-inch necklace‚ particularly one with a delicate pendant. This length adds a touch of elegance without competing with the neckline’s inherent boldness. Avoid overly chunky or busy necklaces that might detract from the clean lines of the off-the-shoulder style.

Layering can be stunning with this neckline. Combine a 14-inch choker with an 18-inch pendant for a layered look. Ensure the choker isn’t too tight‚ allowing for comfortable wear. A longer‚ 20-inch strand can also be added for extra dimension‚ but keep it simple to avoid a cluttered appearance.

Layering Necklaces: A Guide to Length Combinations

The art of layering necklaces lies in creating a harmonious blend of lengths‚ textures‚ and pendants. Start with a base – typically an 18 or 20-inch matinee length – providing a foundation for shorter and longer pieces. Add a delicate 14-inch choker to sit high on the neck‚ creating visual interest.

Introduce a longer strand‚ around 22-24 inches‚ to elongate the torso and add movement. Varying textures‚ like combining a delicate chain with a bolder statement piece‚ prevents the look from feeling monotonous. Mixing metals – gold‚ silver‚ rose gold – can also add depth and personality.

Remember the rule of three: generally‚ limiting yourself to three necklaces avoids a cluttered appearance. Balance pendant sizes; a larger pendant paired with smaller‚ simpler chains works well. Consider the overall silhouette and ensure the layers complement each other‚ rather than competing for attention. Personalize with initial necklaces!

Balancing Lengths and Pendants

Achieving a balanced layered necklace look requires careful consideration of both length and pendant size. Avoid overwhelming the neckline by pairing a statement pendant with delicate‚ shorter chains. Conversely‚ smaller pendants work well with longer strands‚ creating a subtle yet elegant effect.

When combining multiple pendants‚ vary their sizes and shapes to prevent a monotonous appearance. A larger‚ focal pendant can be anchored by smaller‚ complementary pieces. Consider the weight of the pendants; heavier pendants may require sturdier chains to maintain balance and prevent tangling.

Pay attention to the overall proportion relative to your body frame. Shorter necklaces accentuate the collarbone‚ while longer strands elongate the torso. Experiment with different combinations to find what flatters your individual style and neckline. A visualizer tool can help!

Creating a Harmonious Look

A harmonious layered necklace ensemble isn’t just about length and pendants; it’s about creating a cohesive style statement. Mixing textures – think delicate chains with bolder rope necklaces – adds visual interest and depth. Don’t be afraid to combine different metal tones‚ but ensure they complement each other and your outfit.

Personalization plays a key role. Incorporating an initial necklace or a piece with sentimental value adds a unique touch. Remember‚ layering is an expression of individuality. Start with a base layer‚ typically a shorter chain‚ and build outwards‚ adding progressively longer strands.

Keep it streamlined. While layering is fun‚ avoid overcrowding the neckline. A maximum of three chains often provides the most balanced and elegant result. Ultimately‚ confidence is the best accessory – wear what makes you feel beautiful and empowered!

Tools & Resources: Necklace Length Visualizers

Navigating necklace lengths can be tricky‚ but thankfully‚ several online tools simplify the process. Necklace Length Visualizers allow you to virtually “try on” different lengths and styles‚ helping you determine what best complements your body shape and neckline.

These visualizers typically require a few simple inputs: your height‚ neck length‚ neckline type (V-neck‚ crew neck‚ etc.)‚ and even pendant size. Once entered‚ the tool generates a visual representation‚ illuminating the ideal necklace silhouettes for your unique proportions.

These resources are invaluable for online shoppers‚ eliminating guesswork and reducing the risk of purchasing a necklace that doesn’t quite fit or flatter. They provide a clear‚ visual guide‚ ensuring you select the perfect length for a stunning and balanced look. Explore these tools to confidently build your necklace collection!

manual printing

Manual Printing: An Overview

Manual printing encompasses diverse hand-printing techniques, including lithography, letterpress, and relief methods like woodcut and engraving.

Historically significant, these processes offer unique artistic expression, experiencing a modern resurgence driven by creative exploration and tactile appeal.

Access to tools empowers engineers, while technological advancements increase accessibility and user-friendliness, impacting the world of manual printing.

Historical Context of Manual Printing

Manual printing boasts a rich history, originating with ancient relief methods – notably woodblock printing in China centuries ago. This foundational technique spread across Asia, eventually reaching Europe, where it significantly impacted early book production.

The development of the printing press by Johannes Gutenberg in the 15th century, while a mechanical advancement, still relied heavily on manual labor for typesetting and operation. Letterpress, a core manual technique, flourished for centuries, shaping communication and knowledge dissemination.

Lithography, emerging in the late 18th century, offered artists a new manual avenue for printmaking, distinct from relief and intaglio. Throughout the 19th and 20th centuries, various manual processes coexisted with emerging technologies, maintaining a dedicated following among artists valuing the handcrafted aesthetic and unique qualities inherent in hand-printing.

The Resurgence of Manual Printmaking

Despite the dominance of digital printing, manual printmaking is experiencing a vibrant revival in the 21st century. This resurgence is fueled by a growing appreciation for the tactile qualities and unique imperfections inherent in hand-printed works.

Artists and designers are increasingly drawn to the directness and creative control offered by techniques like letterpress, woodcut, and monoprinting. Online resources, workshops, and classes are fostering a new generation of practitioners eager to learn these traditional skills.

Furthermore, the integration of digital design tools with manual processes – using digital layouts for letterpress or scanned textures in collage – expands creative possibilities. This blend of old and new attracts artists seeking both artistic depth and contemporary expression, solidifying manual printing’s continued relevance.

Core Manual Printing Techniques

Manual printing fundamentally relies on relief, lithography, and letterpress methods, each offering distinct aesthetic qualities and requiring specialized tools for image transfer and creation.

Relief Printing: The Oldest Method

Relief printing stands as the earliest known printing technique, a process where the image to be printed is raised from a surface. This foundational method involves carving away the non-image areas, leaving the design raised to accept ink.

It can be executed using a printing press for consistent pressure or manually, utilizing tools like a barren to transfer the ink. The simplicity and directness of relief printing have made it a cornerstone of artistic expression for centuries.

This technique’s enduring appeal lies in its ability to produce bold, graphic images, and its accessibility allows for experimentation with various materials and approaches. It remains a vital practice in contemporary art.

Woodcut as a Relief Technique

Woodcut is a classic example of relief printing, traditionally employing a wooden block as the matrix. Artists carve away sections of the wood, leaving the desired image raised on the surface. This process demands careful planning, as the image is created in reverse.

Once carved, the block is inked, and then pressed onto paper – either manually using a barren or with a printing press. Woodcut is known for its bold lines and graphic quality, often resulting in striking black and white prints.

Historically significant, woodcut was widely used for book illustrations and prints before more refined techniques emerged. It continues to be valued for its distinctive aesthetic and direct, expressive nature.

Wood Engraving: Detail and Precision

Wood engraving, a refined relief printing technique, differs from woodcut through the use of the end-grain of hardwood, typically boxwood. This allows for significantly finer detail and more precise lines than can be achieved with traditional woodcut.

Artists utilize specialized tools – gravers – to carve into the wood, creating a delicate network of lines that define the image. The process is meticulous and requires considerable skill and patience. Often, wood engraving is mistaken for copperplate engraving (intaglio).

The resulting prints exhibit a remarkable level of detail and tonal variation, making wood engraving ideal for illustrations, portraits, and intricate designs. It flourished in the 19th century and remains a valued art form today.

Lithography: Printing from Stone

Lithography, meaning “stone writing,” is a manual printing technique based on the principle that oil and water repel each other. Traditionally, artists draw directly onto a smooth, flat limestone surface with a greasy crayon or tusche.

This creates an image that attracts ink, while the non-greased areas repel it. After treatment with chemicals to fix the image, the stone is dampened with water, and then inked. Paper is then pressed onto the stone, transferring the image.

Lithography allows for a wide range of tonal values and painterly effects, unlike the stark contrasts of some other hand-printing techniques. It became popular in the early 19th century and continues to be practiced by artists today.

Letterpress: The Art of Impression

Letterpress is a manual printing technique where inked, raised surfaces are pressed into paper, creating a tactile impression. Historically, this involved movable type – individual letters and characters assembled to form words and images.

Today, letterpress often utilizes photopolymer plates created from digital designs. These plates are mounted onto a press, inked with specialized inks, and then pressed firmly onto the paper using significant pressure.

The resulting prints exhibit a distinctive, debossed quality, valued for its luxurious feel and vintage aesthetic. Letterpress is celebrated for its craftsmanship and the unique character it imparts to each impression, making it a favored choice for invitations and artistic prints.

Manual Printing Processes Explained

Manual printing relies on matrix preparation, careful inking application, and consistent pressure to transfer images onto paper, yielding unique, handcrafted results.

Preparing the Printing Matrix

Preparing the printing matrix is a foundational step in manual printing, varying significantly based on the chosen technique. For relief methods like woodcut or wood engraving, this involves carving the design into a wood block, removing areas that won’t hold ink.

Lithography requires treating a stone or metal plate to create a surface that accepts ink only in the desired areas. Letterpress utilizes meticulously arranged movable type or etched metal plates.

Regardless of the method, the matrix must be carefully prepared to ensure a clean, consistent transfer of the image. This often involves cleaning, surface treatment, and, in some cases, applying protective coatings to prevent unwanted inking or damage. The quality of the matrix directly impacts the final print’s clarity and detail.

Inking the Matrix

Inking the matrix is a crucial stage in manual printing, demanding precision to achieve a quality impression. Traditionally, printing inks are applied using rollers, ensuring an even coating across the prepared surface. The type of ink selected depends on the printing technique; oil-based inks are common for lithography and letterpress, while water-based inks suit some relief methods.

The inking process requires careful control of pressure and ink quantity. Too little ink results in a faint print, while excessive ink can cause blurring or smudging. Skilled printers utilize techniques to distribute the ink uniformly, avoiding voids or build-up.

Consistent inking is paramount for repeatable results and a visually appealing final product, directly influencing the print’s tonal range and vibrancy.

Applying Pressure for Transfer

Applying pressure is the pivotal moment in manual printing where the inked image transfers from the matrix to the chosen substrate, typically paper. This is achieved through various methods, ranging from hand-rubbing for simpler techniques like woodcuts, to utilizing the substantial force of a printing press for letterpress or lithography.

Consistent and even pressure distribution is essential for a clear, well-defined print. Insufficient pressure yields a weak impression, while excessive pressure can damage both the matrix and the paper.

Manual presses allow for precise control over pressure settings, enabling printers to fine-tune the process for optimal results. The choice of paper also impacts pressure requirements; softer papers necessitate gentler application.

Tools and Materials for Manual Printing

Manual printing requires specialized tools like presses, rollers for inking, and appropriate papers; inks are applied evenly using rollers or pads for optimal results.

Printing Presses (Manual Operation)

Manual printing presses are central to many techniques, offering controlled pressure for transferring ink from the matrix to the paper. These presses range from simple tabletop models ideal for small-scale projects to larger, more robust floor-standing machines capable of handling bigger prints.

Unlike automated presses, manual operation demands physical effort – the printer manually cranks a wheel or lever to apply pressure. This direct involvement allows for greater control over the impression, enabling nuanced adjustments to achieve desired effects.

The pressure applied is crucial; too little results in a faint image, while excessive pressure can distort the paper or damage the matrix. Skilled printers develop a feel for the correct pressure through experience. Different press designs cater to specific techniques, such as letterpress or relief printing, influencing the quality and characteristics of the final print.

Rollers and Ink Distribution Tools

Rollers are indispensable in manual printing, responsible for evenly distributing ink across the printing matrix. Traditionally crafted from materials like rubber or leather, modern rollers often utilize synthetic compounds for durability and consistent performance.

The process involves carefully rolling ink across a flat surface, then transferring it to the matrix. Achieving a uniform ink film is critical; uneven distribution leads to inconsistent print quality. Different roller hardnesses are suited to various inks and matrix surfaces.

Beyond rollers, tools like palette knives and inking plates aid in managing and preparing the ink. These tools facilitate mixing, adjusting ink viscosity, and ensuring a smooth, workable consistency. Proper ink distribution is a foundational skill for successful manual printing, directly impacting the clarity and vibrancy of the final image.

Papers Suitable for Manual Printing

Selecting the right paper is crucial for successful manual printing, significantly impacting the final aesthetic and longevity of the artwork. Different techniques demand different paper characteristics. For relief printing, a sturdy, slightly textured paper is ideal, capable of withstanding the pressure of the press.

Lithography benefits from smoother, less absorbent papers to allow for detailed ink transfer. Letterpress often utilizes softer, thicker stocks to create a pronounced impression. Weight (measured in gsm or lbs) is a key consideration; heavier papers offer greater durability.

Beyond weight, fiber content, surface texture, and acidity levels influence print quality. Archival-quality, acid-free papers are recommended for artwork intended for preservation. Experimentation with various papers is encouraged to discover how different surfaces interact with inks and techniques.

Advanced Manual Printing Techniques

Advanced techniques, like monoprinting, collage combinations, and multi-block layering, expand creative possibilities within manual printing, offering unique artistic expression.

Monoprinting: Unique Impressions

Monoprinting stands as a captivating manual printing technique, celebrated for its capacity to yield utterly singular and unrepeatable impressions. Unlike methods relying on fixed matrices, monoprinting involves creating an image directly on a smooth, non-absorbent surface – often a plexiglass or metal plate.

Artists apply inks, paints, or other media to this surface, then transfer the image to paper using manual pressure. The resulting print is a one-of-a-kind artwork, as the initial image is altered or destroyed during the transfer process. This spontaneity and unpredictability are central to the technique’s appeal.

Monoprinting allows for expressive mark-making, textural exploration, and layering of colors, making it a favored method for artists seeking immediate and intuitive results. It frequently combines well with collage elements, further enhancing its unique character.

Collage and Printmaking Combinations

The fusion of collage and manual printmaking techniques unlocks a realm of exciting artistic possibilities, enriching both disciplines. Artists frequently integrate pre-existing materials – paper scraps, fabrics, found objects – directly onto the printing matrix before inking and transferring the image.

This approach introduces textural diversity and visual complexity to the final print. Alternatively, prints themselves can become elements within a larger collage composition, layered and combined with other materials to create mixed-media artworks.

Monoprinting, in particular, lends itself beautifully to collage, as its spontaneous nature complements the assemblage process. Such combinations allow for unique visual narratives, blending the reproducible qualities of printmaking with the singular character of collage.

Multi-Block Printing: Layering Colors

Multi-block printing is a sophisticated manual printing technique enabling the creation of richly colored images through successive layers. This process involves carving separate printing blocks – typically wood or linoleum – each dedicated to a single color or tonal value.

Each block is inked individually and then carefully aligned and pressed onto the paper, building up the image gradually. Precise registration is crucial to prevent color misalignment, demanding skill and patience from the printmaker;

The order in which blocks are applied significantly impacts the final result, influencing color mixing and visual depth. This method allows for nuanced color gradients and complex compositions, exceeding the limitations of single-block printing, offering artists expansive creative control.

Digital Integration with Manual Printing

Digital design streamlines print matrix creation, while scanning and manipulation enhance manual prints, bridging traditional artistry with modern technology for innovative results.

Using Digital Design for Print Matrices

Digital tools revolutionize the creation of printing matrices for manual printing techniques. Artists now utilize software to design intricate patterns and imagery, offering precision previously unattainable through purely manual methods.

This digital workflow allows for easy modification and experimentation with designs before committing to the physical matrix. Complex geometric shapes, detailed illustrations, and photographic elements can be seamlessly integrated into the artwork.

Once finalized, these digital designs are then transferred onto the chosen matrix – be it a woodblock, linoleum sheet, or lithographic stone – using various methods like laser etching, inkjet printing onto transfer paper, or direct drawing based on the digital template.

The integration of digital design expands creative possibilities, enabling artists to achieve greater complexity and control in their manual printing endeavors.

Scanning and Manipulating Manual Prints

Scanning manual prints opens a realm of possibilities for digital integration and artistic manipulation. High-resolution scans capture the nuances of texture, ink distribution, and subtle imperfections inherent in hand-printed artwork.

These digital images can then be imported into image editing software, allowing artists to adjust colors, contrast, and levels, enhancing specific details or creating unique visual effects. Layers can be added, combining multiple prints or incorporating digital elements.

Furthermore, scanned prints can be digitally collaged, resized, and repeated to create larger compositions or patterns. This process bridges the gap between traditional manual techniques and contemporary digital art practices.

The ability to manipulate scanned prints digitally allows for experimentation and refinement, extending the life and versatility of each original manual print.

Resources and Further Learning

Online tutorials and guides, alongside workshops and classes, provide invaluable instruction in manual printing techniques, fostering skill development and artistic growth.

YouTube channels showcase demonstrations, while dedicated courses offer hands-on experience with various printing methods.

Online Tutorials and Guides

Numerous online resources cater to aspiring manual printers, offering a wealth of knowledge and practical demonstrations. Platforms like YouTube host channels dedicated to various printing techniques, such as relief printing, letterpress, and monoprinting. These videos often provide step-by-step instructions, showcasing the entire process from preparing the matrix to achieving a final, impressive print.

Beyond video tutorials, many websites and blogs offer detailed guides and articles covering specific techniques, materials, and troubleshooting tips. These resources often include photographic documentation and downloadable templates, aiding in the learning process. Searching for terms like “hand printing tutorial” or “relief printing guide” will yield a diverse range of options, suitable for beginners and experienced artists alike. Exploring these digital avenues provides accessible and affordable learning opportunities for anyone interested in the art of manual printing.

Workshops and Classes

Immersive learning experiences are readily available through manual printing workshops and classes offered by art centers, universities, and independent artists. These hands-on sessions provide invaluable guidance from experienced instructors, allowing participants to directly engage with the tools and techniques. Workshops often focus on specific methods, such as letterpress or wood engraving, offering in-depth exploration of the process.

Classes typically cover a broader range of printing techniques, providing a foundational understanding of the art form. The benefit of in-person instruction lies in the immediate feedback and personalized assistance, accelerating skill development. Searching online for “printmaking workshops near me” or checking local art school listings can reveal available opportunities. These experiences foster a collaborative learning environment and provide access to specialized equipment often unavailable for individual use.

overhead door legacy 850 owners manual

Overhead Door Legacy 850 Owners Manual: A Comprehensive Guide

This manual details operation and maintenance for the Legacy 850, compatible with residential doors up to 8ft, weighing 500lbs, featuring CodeDodger remotes.

Welcome to the Overhead Door Legacy 850 garage door opener! This robust system, designed for residential sectional doors, offers reliable performance and advanced features. The Legacy 850 is suitable for doors up to 8 feet in height and weighing up to 500 pounds, exceeding standard lifting force specifications for ½ horsepower openers.

This manual provides comprehensive guidance on installation, operation, maintenance, and troubleshooting. Key features include compatibility with Homelink and Car2U systems, alongside the secure CodeDodger remote control. Crucially, the Safe-T-Beam system must be installed for safe operation. This guide ensures you maximize the benefits of your Legacy 850.

Key Features and Specifications

The Overhead Door Legacy 850 boasts several key features. It’s designed for residential sectional doors, supporting heights up to 8 feet and weights up to 500 pounds. The ½ horsepower motor delivers substantial lifting force, exceeding Overhead Door’s specifications. CodeDodger remote technology provides enhanced security, and seamless integration exists with Homelink and Car2U systems for convenient control.

A vital safety component is the Safe-T-Beam system, required for operation. Installation is straightforward, and the opener is available with either belt or chain drive options. This manual details all specifications, ensuring optimal performance and longevity of your Legacy 850.

Safety Precautions

Prioritize safety during installation and operation of the Legacy 850. Always disconnect power before performing any maintenance or adjustments. The Safe-T-Beam system is crucial; ensure proper installation and regular testing to prevent door closure on obstructions. Never allow children to operate the opener or play near the door.

Inspect the door and opener monthly for proper balance and any signs of damage. Do not attempt repairs beyond your expertise; contact qualified service personnel. Failure to adhere to these precautions could result in serious injury or property damage. Refer to the full manual for comprehensive safety guidelines.

Installation Guide

Proper installation is vital for safe and reliable operation. This guide covers preparing the area, mounting the unit, connecting the door, and adjusting limits.

Preparing for Installation

Before beginning, ensure the garage door is balanced and operates smoothly. Disconnect the existing opener, if present, and verify all hardware is present within the Legacy 850 packaging. Clear the installation area of obstructions, providing ample workspace. Confirm the door’s weight and height fall within the specified limits – up to 8ft high and 500lbs.

Gather necessary tools: ladder, wrenches, screwdrivers, and a drill. The Safe-T-Beam system must be installed during this phase for operational safety. Review all included diagrams and safety precautions before proceeding. Proper preparation minimizes installation time and ensures a secure, functional system. Double-check power supply compatibility.

Mounting the Opener Unit

Securely attach the mounting brackets to the header above the garage door, ensuring they are level and firmly fastened to structural supports. Utilize appropriate hardware for your header type – wood or metal. Carefully position the Legacy 850 opener unit onto the mounted brackets, aligning the rail sections for smooth assembly.

Connect the rail sections, verifying proper alignment and secure fastening. Double-check all bolts and nuts are tightened to the manufacturer’s specifications. Ensure sufficient clearance around the unit for safe operation and future maintenance. This step is crucial for stable and quiet operation of the garage door system.

Connecting the Door

Attach the door bracket to the top section of your garage door, centering it for balanced operation. Connect the door arm to both the door bracket and the opener’s carriage, ensuring a secure connection using the provided hardware. Verify the door moves freely through its full range of motion without obstruction.

Adjust the arm’s length if necessary to achieve proper alignment and efficient power transfer. Improper connection can lead to uneven lifting or strain on the opener. Regularly inspect the connection points for wear and tear, tightening hardware as needed for continued safe and reliable performance.

Adjusting Travel Limits

Precisely set the up and down travel limits using the adjustment screws on the opener unit; Begin by loosening the locking nuts before making adjustments. Slowly rotate the screws to define the desired open and close positions, ensuring the door doesn’t overtravel or stop short of its intended limits.

Test the settings thoroughly after each adjustment, observing the door’s movement carefully. Retighten the locking nuts once the limits are accurately set to prevent accidental changes. Proper travel limit adjustment is crucial for safe operation and prevents potential damage to the door or opener.

Operation and Programming

The Legacy 850 utilizes the CodeDodger remote and is compatible with Homelink/Car2U systems; reprogramming is straightforward, and Safe-T-Beam adjustments are key.

Using the CodeDodger Remote

The CodeDodger remote provides secure access to your garage door, utilizing rolling code technology to prevent unauthorized entry. This system continually changes the access code after each use, enhancing security significantly. Programming additional remotes is a simple process, detailed within this manual, allowing for multiple users. Ensure the remote battery is functioning correctly for optimal performance. Refer to the section on battery replacement for instructions. The remote’s range can be affected by obstructions; maintain a clear line of sight for reliable operation. Learn how to program a new remote via online video tutorials for a visual guide.

Homelink and Car2U Compatibility

The Overhead Door Legacy 850 is designed for seamless integration with both Homelink and Car2U systems found in many vehicles. This compatibility allows you to control your garage door directly from your car’s dashboard, offering convenience and enhanced security. Programming typically involves a simple learning process, where the system recognizes the remote’s signal. Consult your vehicle’s owner’s manual for specific instructions on programming Homelink or Car2U. Ensure the remote is functioning correctly before attempting to link it. Troubleshooting guides are available online if you encounter any difficulties during the setup process.

Reprogramming the Garage Door Code

Reprogramming the Legacy 850’s garage door code is a crucial security measure, especially if you’ve lost a remote or suspect unauthorized access. The process involves accessing the learning mode on the opener unit, typically by pressing and holding a designated “Learn” button. Then, activate the remote you wish to program. The opener will recognize and store the new code. Online video tutorials demonstrate this process visually, simplifying the steps. Always clear all existing codes before programming new ones for maximum security; Refer to the full owner’s manual for detailed instructions and safety precautions.

Adjusting the Safe-T-Beam System

The Safe-T-Beam system is a vital safety feature of the Legacy 850, preventing the door from closing on obstructions. Proper adjustment ensures reliable operation. Begin by verifying the beams are aligned, indicated by steady lights on the opener unit. If the lights flash or are off, readjust the beam sensors until alignment is achieved. Regularly test the system by placing an object in the door’s path; the door should reverse immediately. Consult the owner’s manual for detailed troubleshooting steps if issues persist, ensuring the system functions correctly for enhanced safety.

Maintenance and Troubleshooting

Routine checks, belt/chain tension adjustments, and addressing common issues are crucial for the Legacy 850’s longevity; refer to the manual for guidance.

Routine Maintenance Schedule

To ensure optimal performance and longevity of your Overhead Door Legacy 850, a consistent maintenance schedule is highly recommended. Regularly inspect the door’s tracks for obstructions and ensure they remain clean and free of debris. Lubricate the moving parts, including rollers, hinges, and the chain or belt drive system, every six months with a silicone-based lubricant.

Visually examine the Safe-T-Beam system monthly to confirm proper alignment and functionality. Test the system by interrupting the beam while the door is closing. A full operational check, including remote control functionality and travel limit adjustments, should be performed annually. Following this schedule will help prevent potential issues and maintain the safety and reliability of your garage door opener.

Belt/Chain Tension Adjustment

Maintaining proper tension in the Legacy 850’s belt or chain drive is crucial for smooth, quiet operation and preventing premature wear. Regularly inspect the drive for excessive slack or tightness. If the chain appears loose, utilize the adjustment bolts located near the motor unit to incrementally tighten it, ensuring it doesn’t become overly strained.

For belt drives, check for signs of stretching or damage. Proper tension allows for efficient power transfer and reduces noise. Avoid over-tightening, as this can damage the motor or drive components. Consult a qualified technician if you are unsure about performing this adjustment, prioritizing safety and optimal performance.

Troubleshooting Common Issues

If your Legacy 850 isn’t responding, first check the power supply and ensure the Safe-T-Beam system is properly aligned and free from obstructions – it must be functional for the door to close. A non-working remote can often be resolved by replacing the battery or reprogramming it. For doors that reverse unexpectedly, verify the Safe-T-Beam and adjust force settings cautiously.

Noisy operation might indicate a need for belt/chain tension adjustment or lubrication. If issues persist, consult the full owner’s manual or contact Overhead Door customer support for assistance, avoiding potentially dangerous self-repairs.

Replacing the Remote Battery

To replace the battery in your CodeDodger remote for the Legacy 850, carefully open the remote’s casing, typically by sliding or prying it open – consult the manual for specifics. Remove the old battery, noting its polarity (+/-), and insert a fresh battery of the correct type. Ensure proper alignment before closing the casing securely.

A weak battery is a common cause of remote malfunction. After replacement, test the remote’s functionality. If problems continue, attempt reprogramming the remote to the garage door opener, following the instructions in the programming section of this manual.

Understanding the Safe-T-Beam System

The Safe-T-Beam system is crucial for safety; it must be installed for the Legacy 850 to close, preventing door descent upon obstruction detection.

Safe-T-Beam Installation Guidelines

Proper Safe-T-Beam installation is paramount for operational safety with your Overhead Door Legacy 850. Ensure the beam is positioned directly across the door opening, no higher than six inches above the floor. Mount the sensors securely, aligning them so the LED indicators face each other; Wiring must be carefully routed, avoiding any contact with moving door parts or sharp edges.

Confirm the beam’s path is unobstructed; even small items can interfere with functionality. Regularly inspect mounting brackets for tightness and alignment. The system requires power to operate, so verify connections are secure. Remember, the door will not close unless the Safe-T-Beam is correctly installed and functioning, safeguarding against potential hazards.

Testing the Safe-T-Beam Functionality

Thoroughly test the Safe-T-Beam system after installation and routinely thereafter for your Legacy 850. With the door closing, obstruct the beam’s path with a cardboard box. The door should immediately reverse to the open position, confirming the sensors are working correctly. Repeat this test several times, varying the obstruction’s location within the beam’s range.

Observe the LED indicators on the sensors; a solid light typically indicates proper alignment and function. If the door fails to reverse, re-check the installation, wiring, and alignment. A flashing light may signal an issue requiring troubleshooting. Prioritize this testing – it’s crucial for preventing accidents and ensuring safe operation.

Troubleshooting Safe-T-Beam Problems

If your Legacy 850’s Safe-T-Beam isn’t functioning, begin by verifying the power supply and wiring connections. Ensure the sensors are securely mounted and properly aligned – even slight misalignments can cause issues. Check the LED indicators; flashing lights often signal a problem. Clean the lens of each sensor with a soft cloth, removing any dirt or obstructions.

If problems persist, consult the owner’s manual for specific error codes. A disconnected wire or a faulty sensor may require replacement. Remember, the Safe-T-Beam is a critical safety feature; if you’re unable to resolve the issue, contact a qualified technician.

Technical Specifications

The Legacy 850 boasts a 1/2 HP motor, handling doors up to 8ft high and 500lbs. Standard 120V power is required for operation;

Motor Specifications (1/2 HP)

The Overhead Door Legacy 850 utilizes a robust ½ horsepower (HP) motor designed to provide reliable and efficient operation for residential garage doors. This motor is specifically engineered to handle the demands of frequent use while maintaining optimal performance. It’s capable of lifting and lowering doors with varying weights and sizes, adhering to Overhead Door’s stringent lifting force specifications.

The motor’s construction prioritizes durability and longevity, ensuring years of dependable service. It’s designed to work seamlessly with both belt and chain drive systems offered with the Legacy 850. Proper maintenance, as outlined in this manual, is crucial for maximizing the motor’s lifespan and preventing potential issues.

Door Weight and Height Limitations

The Overhead Door Legacy 850 opener is designed for standard residential sectional garage doors, with specific weight and height limitations to ensure safe and reliable operation. This model effectively manages doors up to a maximum height of 8 feet. Exceeding this height may compromise the opener’s performance and void the warranty.

Furthermore, the Legacy 850 is rated to handle doors weighing up to 500 pounds. Attempting to operate a door exceeding this weight limit can cause significant damage to the opener and potentially create a safety hazard. Always verify your door’s weight before installation and adhere to these specified limits.

Power Requirements

The Overhead Door Legacy 850 garage door opener operates on a standard 120-volt, 60Hz electrical supply, commonly found in most North American residences. A dedicated 15-amp circuit is recommended to prevent interference from other appliances and ensure optimal performance. It’s crucial to verify your electrical system meets these requirements before installation.

The opener utilizes a 1/2 horsepower motor, demanding sufficient power for smooth and efficient door operation. Proper grounding is essential for safety, protecting against electrical shock. Always consult a qualified electrician if you are unsure about your home’s electrical compatibility or installation procedures.

Warranty Information

The Legacy 850 includes a limited, non-transferable warranty; details are found within the owner’s manual. Contact customer support for specific claim procedures.

Limited Warranty Details

The Overhead Door Legacy 850 garage door opener is backed by a limited warranty, providing peace of mind to homeowners. This warranty covers defects in materials and workmanship under normal use for a specified period. The duration varies depending on the component – motor, parts, and functional components each have distinct coverage timelines.

It’s crucial to retain proof of purchase for warranty validation. The warranty is void if the opener is misused, improperly installed, or subjected to unauthorized modifications. Regular maintenance, as outlined in this manual, is essential to maintain warranty validity. This warranty does not cover labor costs associated with repairs or replacements.

Non-Transferable Warranty Clause

Please note that the Limited Warranty offered with the Overhead Door Legacy 850 garage door opener is strictly non-transferable. This means the warranty benefits are exclusively available to the original purchaser of the unit and cannot be passed on to subsequent owners of the property or the garage door opener itself.

Any attempt to transfer the warranty is considered a breach of the warranty agreement and will immediately void all coverage. This clause ensures that the warranty remains a direct benefit to the initial buyer, incentivizing proper maintenance and responsible use throughout the product’s lifespan. Proof of original purchase is required for all warranty claims.

Contacting Customer Support

For assistance with your Overhead Door Legacy 850, or to address any questions regarding installation, operation, or warranty claims, our dedicated customer support team is readily available. We strive to provide prompt and helpful service to ensure your complete satisfaction. Please have your model number and date of purchase available when contacting us.

You can reach us via phone during business hours, or through our online support portal, which features a comprehensive FAQ section and troubleshooting guides. Detailed contact information, including phone numbers and email addresses, can be found within this owner’s manual and on our official website.

Remote Control Programming

Programming remotes for the Legacy 850 is straightforward, utilizing the CodeDodger system. Additional remotes can be added, and existing codes cleared easily.

Programming Additional Remotes

To program additional CodeDodger remotes for your Overhead Door Legacy 850, begin by ensuring the garage door opener is compatible with the remote you intend to use. Locate the “Learn” button on the opener unit – it’s typically yellow or orange. Press and release this button; a small indicator light will illuminate. Within thirty seconds, press and hold the button on the new remote you wish to program.

The indicator light on the opener unit should blink or change color, confirming successful programming; Release the button on the remote. Test the remote by pressing it to operate the garage door. Repeat this process for each additional remote you want to add to the system. If programming fails, consult the full owner’s manual for detailed troubleshooting steps.

Clearing All Remote Codes

If you need to erase all programmed remote codes on your Overhead Door Legacy 850, locate the “Learn” button on the garage door opener unit. This button is crucial for resetting the system’s memory. Press and hold the “Learn” button continuously until the indicator light begins to flash rapidly. This flashing sequence signifies that all previously programmed remote codes have been successfully cleared from the system’s memory.

After the light stops flashing, release the button. Now, you will need to reprogram all your remotes. This process ensures only authorized users have access to operate your garage door, enhancing security. Refer to the “Programming Additional Remotes” section for detailed instructions.

CodeDodger Remote Features

The CodeDodger remote, included with your Overhead Door Legacy 850, offers enhanced security through rolling code technology. This means each time the remote is used, a new code is generated, preventing unauthorized access even if the code is intercepted. The remote is designed for simple, user-friendly operation, allowing for convenient control of your garage door.

It’s compatible with Homelink and Car2U systems for seamless integration with your vehicle. The remote’s compact design makes it easy to carry, and its durable construction ensures long-lasting performance. Explore the programming options to personalize your experience.

Advanced Settings and Adjustments

Fine-tune your Legacy 850 with force, speed, and vacation mode controls for optimal performance and security, customizing operation to your specific needs.

Force Adjustment Settings

The Legacy 850’s force adjustments are critical for safe and reliable operation. These settings dictate the amount of power the opener applies to overcome door weight and resistance. Improper adjustment can lead to operational issues or, more importantly, safety hazards. Carefully follow the manufacturer’s guidelines when modifying these settings.

Adjustments should only be made if the door struggles to fully open or close, or if the Safe-T-Beam system is frequently triggered. Start with small increments and thoroughly test the door’s operation after each adjustment. Excessive force can damage the door or opener, while insufficient force may result in the door reversing unexpectedly. Always prioritize safety and consult a qualified technician if you are unsure about any aspect of the force adjustment process.

Up/Down Speed Control

The Overhead Door Legacy 850 allows for adjustable up and down speeds, influencing the door’s overall operation. Modifying these settings impacts both convenience and safety. Faster speeds offer quicker access, but may increase stress on the door and opener components. Slower speeds provide smoother, quieter operation, and enhance safety, particularly around children and pets.

Adjustments are typically made via dip switches or electronic settings within the opener unit. Refer to the detailed instructions in this manual for specific procedures. Always test the door’s full range of motion after any speed adjustment. Ensure the Safe-T-Beam system functions correctly at all speeds. Prioritize safety and avoid excessively high speeds.

Vacation Mode Activation

The Legacy 850’s Vacation Mode enhances security during extended absences. When activated, the opener disables remote controls and the wall button, preventing unauthorized access. The door can still be operated manually from the inside, ensuring emergency egress. This feature is crucial for deterring potential intruders while you’re away.

Activation typically involves a specific button sequence on the opener unit or through the CodeDodger remote. Consult the detailed instructions within this manual for precise steps. Remember to deactivate Vacation Mode upon your return to restore normal operation. Always verify the mode’s status before relying on remote access.

clicker keypad instruction manual

Clicker universal garage door opener wireless keyless entry systems, like model KLIK2U, offer convenient access. Understanding the instructions is crucial for successful operation.

These systems eliminate the need for physical remotes, providing secure and straightforward control of your garage door. Proper setup ensures reliable performance.

This guide will walk you through the process, covering everything from initial preparation to advanced features, referencing the Clicker keypad manual.

What is a Clicker Keypad?

A Clicker keypad is a wireless keyless entry system designed for garage door operation, offering a convenient alternative to traditional remote controls. Models like KLIK2U allow access using a personal four-digit code, eliminating the need to carry or search for a remote.

This device mounts near your garage door and communicates wirelessly with your garage door opener. It’s a particularly useful solution for households with multiple users, or for those who frequently misplace remotes. The Clicker system provides a secure and reliable method of controlling access to your home.

Referencing the instruction manual is vital for understanding its features and ensuring proper installation and programming. It’s a universal system, compatible with many brands, but some, like Genie’s rotating code systems, present incompatibility issues.

Benefits of Using a Clicker Keypad

Employing a Clicker keypad, as detailed in the instruction manual, delivers numerous advantages. Foremost is the elimination of lost or misplaced garage door remotes, enhancing security and convenience. The keyless entry system allows multiple users to have unique codes, providing controlled access.

Installation is generally straightforward, and the Clicker is compatible with a wide range of garage door opener brands – Chamberlain, Sears, and others – though incompatibility exists with some Genie systems. The model KLIK2U offers a reliable and secure alternative.

Furthermore, a keypad reduces the risk of unauthorized access compared to readily duplicated remotes. Following the programming instructions carefully ensures optimal performance and peace of mind for homeowners.

Understanding Your Clicker Model

Identifying your specific Clicker model (KLIK2U, CLK1D) is the first step, as instructions vary. Refer to your manual for detailed compatibility information.

Identifying Your Specific Clicker Model (e.g., KLIK2U, CLK1D)

Clicker keypads come in various models, with KLIK2U and CLK1D being common examples. Locating the exact model number is vital for accessing the correct programming instructions and troubleshooting guidance. This number is typically found on a sticker located on the back of the keypad unit itself, or within the battery compartment.

The Clicker keypad manual specific to your model provides detailed diagrams and step-by-step procedures. Downloading the official manual (CLK1D, CLK1D2) from the manufacturer’s website ensures you have the most accurate and up-to-date information. Knowing your model also helps determine compatibility with your garage door opener, avoiding potential issues during setup.

Incorrect instructions used for the wrong model can lead to programming failures or malfunction. Always double-check the model number before proceeding with any programming steps.

Compatibility with Garage Door Openers

Clicker keypads are designed for universal compatibility, but certain limitations exist. The Clicker is generally compatible with most garage door openers, including those from Chamberlain and Sears, as outlined in the instruction guides. However, it’s crucial to note a significant incompatibility: Genie garage door openers utilizing rotating code systems.

These rotating code systems employ a different security protocol, preventing seamless integration with standard Clicker keypads. Before purchasing or programming, verify your garage door opener’s brand and security features. Referencing the Clicker keypad manual will detail specific compatibility information.

Proceeding with instructions on incompatible systems may result in failure; Always confirm compatibility to ensure a successful and secure setup.

Incompatibility Issues (e.g., Genie rotating code systems)

A primary concern when using a Clicker keypad is incompatibility with certain garage door opener systems, notably Genie’s rotating code technology. These systems generate a new security code each time the opener is used, a feature the standard Clicker cannot interpret. Attempting to program a Clicker with a Genie rotating code opener will likely result in failure, as detailed in the instruction manual.

The Clicker keypad manual explicitly states this limitation. Users with Genie openers should explore alternative keyless entry solutions specifically designed for rotating code compatibility. Ignoring this incompatibility can lead to frustration and a non-functional system. Always verify your opener’s type before proceeding with programming.

Initial Setup and Preparation

Before programming your KLIK2U Keyless Entry, gather required tools and information. Review the Clicker keypad manual and prioritize safety precautions for a smooth process.

Required Tools and Information

To successfully program your Clicker keypad, specifically models like KLIK2U or CLK1D, you’ll need a few essential items. First, have your existing garage door opener remote control readily available – this is crucial for transferring the code.

Ensure you have access to a working power source for the keypad itself, as it requires battery power to function during the programming sequence.

Most importantly, locate and carefully read the Clicker keypad manual (CLK1D, CLK1D2) for detailed, model-specific instructions. Knowing your garage door opener’s brand (Chamberlain, Sears, etc.) is also vital, as compatibility varies.

Finally, a clear, well-lit workspace will make the process easier and more efficient.

Safety Precautions Before Programming

Prior to programming your Clicker keypad, prioritizing safety is paramount. NEVER permit anyone to cross the path of a moving gate or door during testing or operation. Ensure the area around the garage door is clear of people and obstructions.

Always supervise the programming process and be prepared to immediately stop the door’s operation if any unexpected behavior occurs.

Review the Clicker keypad manual thoroughly, paying close attention to any warnings or cautions. Understand that the Clicker isn’t compatible with all systems, like Genie’s rotating code, potentially causing malfunctions.

If unsure about any step, consult a qualified technician before proceeding.

Programming the Clicker Keypad

Programming involves using an existing remote or directly entering a new code on the CLICKER keypad. Watch for the purple flash LED indicator during the process.

Programming with Existing Garage Door Opener Remote

To program your Clicker keypad using an existing garage door opener remote, begin by ensuring the keypad is in programming mode. Press the “Learn” button on your garage door opener motor unit – its location varies by brand, so consult your opener’s manual if needed.

Within 30 seconds, press and release the button on your garage door opener remote that you wish to program to the Clicker keypad. Both LEDs on the keypad will flash purple, signaling successful receipt of the remote’s signal.

If the LEDs do not flash purple, repeat the process, ensuring you are within range and that the remote has a fresh battery. This method effectively links your existing remote’s code to the keypad for convenient access.

Entering a New Code on the Keypad

If you need to establish a new, unique code on your Clicker keypad, begin by pressing the “Program” button. The keypad’s LED will illuminate, indicating it’s ready for code input. Carefully enter a four-digit code using the numeric buttons. Avoid easily guessable combinations for enhanced security.

After entering your desired code, press the “Program” button again to confirm. The keypad will briefly display the entered code, then the LEDs will flash purple, signifying successful code registration.

Test the new code immediately to ensure functionality. Remember to keep your code confidential and consider changing it periodically for optimal security.

LED Indicator Signals During Programming (Purple Flash)

The Clicker keypad utilizes LED signals to communicate programming status. A consistent purple flash is a key indicator of successful communication between the keypad and your garage door opener. This flash confirms the keypad is learning or has successfully stored a new code.

If the LED flashes rapidly in purple, it suggests a potential issue with the signal or compatibility. A solid purple light typically means the keypad is in programming mode, awaiting input.

Pay close attention to these signals during the programming process; they provide valuable feedback. Refer to the Clicker manual for a complete understanding of all LED indicators.

Troubleshooting Common Issues

If your Clicker keypad isn’t responding, or the code isn’t working, check compatibility with brands like Chamberlain and Sears. Consult the manual!

Keypad Not Responding

If the Clicker keypad fails to respond, begin by verifying the battery’s charge. A weak battery is a frequent cause of operational issues. Ensure the battery is correctly installed, observing the proper polarity as indicated inside the battery compartment.

Next, confirm that the keypad is within range of your garage door opener’s receiver. Excessive distance or obstructions can interfere with the signal. Try operating the keypad closer to the garage door opener unit.

Review the programming steps outlined in the Clicker keypad manual to ensure the keypad is correctly paired with your garage door opener. A failed or incomplete programming sequence will prevent functionality. Finally, check for any potential interference from other wireless devices.

Code Not Working

If your programmed code isn’t working, double-check the entered digits against your original code. Even a single incorrect number will prevent access. Refer to the Clicker keypad manual for the correct programming procedure and ensure each step is followed precisely.

Consider that some garage door openers, particularly Genie models utilizing rotating code systems, are incompatible with Clicker keypads. Verify compatibility before proceeding with programming. If compatibility isn’t an issue, attempt to reprogram the keypad following the manual’s instructions.

Ensure no recent changes have been made to your garage door opener’s settings, as this could invalidate the programmed code. A factory reset of the opener might be necessary in some cases.

Compatibility Problems with Specific Brands (Chamberlain, Sears)

While the Clicker keypad boasts broad compatibility, issues can arise with certain brands like Chamberlain and Sears. The Clicker manual notes that programming procedures may vary depending on the specific model of your garage door opener. Always consult your opener’s documentation alongside the Clicker instructions.

For Chamberlain and Sears openers, ensure you’re following the correct “TYPE 4” programming sequence as outlined in the Clicker instructions. Incorrectly selecting the type will prevent successful code entry. If problems persist, check for firmware updates on your garage door opener.

Some older Chamberlain and Sears models may require a compatibility bridge or adapter for seamless integration with the Clicker keypad.

Advanced Features and Settings

The Clicker keypad allows backlight adjustment for visibility and easy battery changes to maintain functionality. Refer to your manual for detailed instructions.

Adjusting Keypad Backlight

Clicker keypad backlighting enhances visibility in low-light conditions, making operation easier and safer. While specific instructions may vary slightly depending on your model (like CLK1D or CLK1D2), the general process is straightforward. Typically, adjusting the backlight involves a dedicated button or a sequence of key presses on the keypad itself.

Consult your Clicker manual for the precise method applicable to your device. Some models offer multiple brightness levels, allowing you to customize the illumination to your preference. Experiment with the settings to find the optimal balance between visibility and battery conservation. A brighter backlight consumes more power, potentially reducing battery life. Remember to always refer to the official instructions for the most accurate guidance.

Changing the Battery

Maintaining your Clicker keypad requires periodic battery replacement. A low battery can cause operational issues, such as unresponsive buttons or a diminished signal range. The Clicker manual details the specific battery type required for your model – typically a 9V battery. Before replacing the battery, ensure you have a compatible replacement readily available.

Carefully open the battery compartment, usually located on the back of the keypad unit. Remove the old battery and connect the new one, observing the correct polarity (+ and -). Securely close the battery compartment. After replacement, you may need to reprogram the keypad to your garage door opener; refer to the programming instructions.

Clicker Keypad Manual Resources

Download the official Clicker manual (CLK1D, CLK1D2) online for detailed instructions. Find FAQs and support to resolve any programming or operational issues;

Downloading the Official Manual (CLK1D, CLK1D2)

Clicker Model CLK1D and CLK1D2 owners can easily access comprehensive documentation online. Obtaining the official manual provides detailed instructions for programming, troubleshooting, and understanding all features.

These manuals are typically available as PDF files, ensuring compatibility across various devices. A quick online search for “Clicker CLK1D manual” or “Clicker CLK1D2 manual” will lead you to the official download locations.

The manual covers essential topics like initial setup, entering new codes, interpreting LED indicator signals (like the purple flash during programming), and addressing common compatibility concerns. It’s a valuable resource for maximizing your keyless entry system’s functionality.

Always refer to the official documentation for the most accurate and up-to-date information regarding your specific Clicker keypad model.

Finding Online Support and FAQs

Beyond the official Clicker keypad manual, numerous online resources offer support and answers to frequently asked questions. Many websites host dedicated FAQ sections addressing common programming issues and compatibility concerns with brands like Chamberlain and Sears.

Online forums and communities dedicated to home automation often feature discussions about Clicker systems, providing a platform to share experiences and solutions. Searching for specific error messages or problems can quickly yield helpful insights.

Manufacturer support websites often provide troubleshooting guides and contact information for direct assistance. Remember that the Clicker is not compatible with some Genie rotating code systems, so check compatibility first.

Utilizing these resources can streamline the setup process and resolve issues efficiently, ensuring a smooth experience with your keyless entry system.

ortho glass splinting manual pdf

Welcome! This manual provides a comprehensive guide to Ortho-Glass splinting, assisting users in maximizing product potential and joining a thriving community.

Before utilizing your Ortho-Glass Splinting Manual, familiarize yourself with its contents for optimal results and safe application techniques.

What is Ortho-Glass?

Ortho-Glass represents a revolutionary advancement in orthopedic immobilization, utilizing lightweight fiberglass casting tape instead of traditional plaster. This innovative material offers significant benefits for both patients and practitioners.

The core of effective Ortho-Glass application lies in understanding the principles detailed within your Ortho-Glass Splinting Manual. This manual serves as your primary resource, guiding you through each step of the process. It details how Ortho-Glass provides superior strength, durability, and breathability compared to conventional casts.

Furthermore, the manual emphasizes the importance of proper technique for achieving optimal immobilization and patient comfort. Mastering these techniques, as outlined in the PDF, ensures successful clinical outcomes and patient satisfaction.

History and Development of Ortho-Glass Splinting

The evolution of orthopedic immobilization began with heavy plaster casts, gradually transitioning towards lighter, more comfortable alternatives. Fiberglass casting tape, the foundation of Ortho-Glass, emerged as a significant improvement in the mid-20th century.

Your Ortho-Glass Splinting Manual details this progression, highlighting key milestones in material science and clinical application. It explains how early fiberglass casts were bulky and difficult to mold, but subsequent advancements led to the development of user-friendly, high-performance tapes.

The PDF version of the manual provides a historical context, emphasizing the ongoing refinement of techniques and the increasing focus on patient-centered care. Understanding this history, as presented in the manual, is crucial for appreciating the benefits of modern Ortho-Glass splinting.

Benefits of Ortho-Glass Splints

Ortho-Glass splints offer numerous advantages over traditional casting materials, enhancing both patient comfort and clinical efficiency. The Ortho-Glass Splinting Manual comprehensively outlines these benefits, emphasizing lightweight construction for improved mobility and breathability to reduce skin irritation.

The manual’s PDF version details superior strength and durability, allowing for effective immobilization while minimizing the risk of cracking or breakdown. It also highlights faster application and removal times, streamlining workflow for healthcare professionals.

Furthermore, Ortho-Glass is radiolucent, enabling clear X-ray imaging without requiring removal. This manual serves as a valuable resource, illustrating how these features contribute to optimal patient outcomes and a positive treatment experience.

Materials and Equipment

Essential components for successful splinting are detailed within the Ortho-Glass Splinting Manual’s PDF, ensuring practitioners have a complete understanding of required supplies.

Components of an Ortho-Glass Splinting Kit

A standard Ortho-Glass splinting kit, as thoroughly outlined in the Ortho-Glass Splinting Manual’s PDF, typically includes several key elements. These are designed to facilitate effective immobilization and support. Stockinette provides a protective layer against the skin, preventing direct contact with the casting material.

Padding materials, such as Webril or felt, are crucial for cushioning bony prominences and ensuring patient comfort. Ortho-Glass casting tape itself, composed of fiberglass-impregnated material, is the primary immobilization component.

Scissors are necessary for precise stockinette and casting tape cutting. The manual’s PDF also details optional components like gloves, water spray bottles for tape activation, and measuring devices for accurate application. Understanding each component’s role is vital for successful splinting.

Necessary Tools for Application

Successful Ortho-Glass splinting, as detailed within the Ortho-Glass Splinting Manual’s PDF, relies on having the correct tools readily available. Sharp scissors are paramount for cleanly cutting the stockinette and casting tape, preventing fraying and ensuring a smooth edge. A water spray bottle is essential for activating the fiberglass in the casting tape, initiating the hardening process.

Gloves are recommended to maintain a sterile environment and protect the practitioner’s hands. Measuring devices, like a tape measure, ensure accurate material sizing for optimal fit. The manual’s PDF emphasizes the importance of a clean work surface.

Finally, a bowl of clean water is needed for the spray bottle, and potentially, a small bucket for disposal of used materials. Proper tool preparation contributes significantly to a well-applied splint.

Understanding Glass Fiber Casting Tape Properties

The Ortho-Glass Splinting Manual’s PDF details crucial properties of glass fiber casting tape. These tapes are composed of fiberglass filaments woven into a knitted material, impregnated with a resin. Activation with water initiates a rapid exothermic reaction, causing the tape to harden and provide rigid support.

Understanding the tape’s porosity is key; it allows for breathability, minimizing skin irritation. The manual’s PDF highlights the importance of consistent water application for uniform hardening. Different tape widths offer varying levels of support, influencing application technique.

Weight-bearing capacity and radiopacity are also discussed, impacting post-application care and imaging considerations. Proper knowledge of these properties, as outlined in the manual, ensures safe and effective splinting.

Patient Assessment and Preparation

The PDF manual emphasizes thorough patient evaluation, identifying appropriate splinting indications and contraindications before application for optimal outcomes.

Careful skin inspection and preparation are vital, ensuring a secure and comfortable splinting experience.

Indications for Ortho-Glass Splinting

The Ortho-Glass Splinting Manual PDF details numerous scenarios where this technique proves beneficial. Firstly, it’s ideal for stable fractures – those not requiring immediate surgical intervention – providing immobilization for healing. Secondly, soft tissue injuries like sprains and strains respond well, offering support and reducing movement.

Furthermore, the manual highlights its use in managing tendonitis and carpal tunnel syndrome, offering compression and wrist stabilization. Additionally, post-operative support following certain orthopedic procedures is a key indication. The manual also specifies its suitability for managing minor deformities and providing protective immobilization after injury.

Crucially, the PDF stresses the importance of a proper diagnosis to confirm the appropriateness of Ortho-Glass splinting for each individual case, ensuring optimal patient care and recovery.

Contraindications for Ortho-Glass Splinting

The Ortho-Glass Splinting Manual PDF clearly outlines situations where this method is not recommended. Firstly, open fractures – where bone protrudes through the skin – are a strict contraindication, requiring immediate surgical intervention. Secondly, unstable fractures demanding surgical fixation cannot be managed with splinting alone.

Furthermore, active infections in the affected limb preclude Ortho-Glass application, as it could exacerbate the condition. Additionally, neurovascular compromise – impaired blood flow or nerve function – necessitates immediate medical attention, not splinting. The manual also details that severe soft tissue swelling or blistering contraindicates its use.

Crucially, the PDF emphasizes that patients with known allergies to casting materials should not undergo Ortho-Glass splinting, and a thorough patient history is vital to avoid adverse reactions.

Skin Inspection and Preparation

The Ortho-Glass Splinting Manual PDF stresses meticulous skin assessment before application. Firstly, thoroughly inspect the limb for any open wounds, abrasions, or skin infections; these must be addressed before proceeding. Secondly, assess skin integrity for fragility or pre-existing conditions like eczema, which may increase risk of irritation.

Furthermore, the manual details cleaning the skin with mild soap and water, ensuring it’s completely dry before applying the stockinette. Additionally, remove any jewelry, watches, or other objects that could constrict circulation under the splint. Crucially, avoid lotions or creams, as they can interfere with adhesion.

Finally, the PDF highlights the importance of padding bony prominences to prevent pressure sores and ensuring the patient understands the need to report any skin changes immediately.

Application Techniques

The Ortho-Glass Splinting Manual PDF details a step-by-step process, beginning with stockinette application, followed by padding, and precise casting tape placement.

Molding and shaping are crucial for optimal support.

Stockinette Application

Preparing the Limb: The Ortho-Glass Splinting Manual PDF emphasizes proper stockinette application as foundational. Begin by selecting a stockinette size slightly larger than the limb’s circumference, ensuring full coverage beyond the intended splint area.

Application Process: Carefully roll the stockinette onto the limb, avoiding wrinkles which can cause pressure points. The manual advises gentle stretching to achieve a snug, yet non-constricting fit.

Securing the Stockinette: Once applied, secure the stockinette with adhesive tape or a bandage at both ends, preventing slippage during subsequent splinting steps. Ensure the skin is visible at the edges for monitoring. The PDF stresses avoiding excessive tension to maintain circulation.

Important Note: Always inspect the skin before and after stockinette application for any signs of irritation or compromised circulation.

Padding and Protection

Essential Layer: The Ortho-Glass Splinting Manual PDF highlights padding as crucial for patient comfort and preventing skin breakdown. Apply a layer of soft padding material – cotton or synthetic cast padding – over the stockinette.

Strategic Placement: Focus padding on bony prominences like the ulnar styloid, radial head, or malleoli, as detailed in the manual. Avoid excessive bulk, which can compromise splint fit.

Padding Technique: Wrap the padding smoothly, overlapping each layer by half its width. The PDF recommends avoiding wrinkles and ensuring even distribution.

Protection Focus: Pay special attention to areas prone to pressure sores. Proper padding safeguards the skin and enhances overall splint effectiveness, as outlined in the manual’s guidelines.

Applying the Ortho-Glass Casting Tape

Activation is Key: The Ortho-Glass Splinting Manual PDF emphasizes proper activation of the casting tape. Immerse the tape in water for the recommended duration – typically 5-10 seconds – until fully saturated.

Squeeze Out Excess: Gently squeeze out excess water, avoiding twisting or wringing, as detailed in the manual. This ensures optimal adhesion and molding properties.

Application Technique: Begin applying the tape proximally, overlapping each layer by approximately 50%. The PDF illustrates a smooth, even application to create a uniform shell.

Layering for Strength: Apply multiple layers – typically 3-5 – to achieve the desired rigidity and support, following the manual’s guidance for specific applications.

Molding and Shaping the Splint

Immediate Molding: The Ortho-Glass Splinting Manual PDF stresses the importance of immediate molding while the tape is still pliable. Utilize gloved hands to gently contour the splint to the patient’s anatomy.

Pressure and Support: Apply firm, even pressure to create a well-defined shell that provides optimal support and immobilization, as demonstrated in the manual’s illustrations.

Avoid Creases: Minimize creases or wrinkles in the splint, as these can cause skin irritation or pressure points. Smooth out any imperfections promptly.

Setting Time: Allow sufficient setting time – typically 2-5 minutes – for the splint to fully harden before applying any further stress or movement, per the PDF’s instructions.

Specific Splinting Applications

Detailed Guidance: The Ortho-Glass Splinting Manual PDF offers specific techniques for wrist, hand, forearm, finger, ankle, and foot immobilization procedures.

Follow the manual’s illustrations for precise application and optimal patient outcomes.

Wrist and Hand Splinting

Application Techniques: The Ortho-Glass Splinting Manual PDF details wrist and hand splinting procedures, emphasizing proper positioning and support. Begin with stockinette application, ensuring full coverage, followed by strategic padding over bony prominences for comfort and protection.

Tape Application: Apply Ortho-Glass casting tape smoothly, overlapping each layer by 50% to achieve optimal rigidity. Mold the splint to conform to the wrist and hand’s natural contours, providing adequate immobilization while allowing for digital function where appropriate.

Manual Reference: Refer to the manual’s diagrams for specific techniques addressing various wrist and hand injuries, including sprains, fractures, and tendonitis. Always prioritize patient comfort and neurovascular assessment post-application.

Forearm Splinting

Detailed Guidance: The Ortho-Glass Splinting Manual PDF provides comprehensive instructions for effective forearm splinting, crucial for stabilizing fractures and soft tissue injuries. Begin by applying a stockinette, extending beyond the intended splint boundaries for secure coverage.

Padding is Key: Generous padding, particularly around the elbow and bony prominences, is essential for patient comfort and preventing pressure sores. The manual illustrates optimal padding placement for various forearm conditions.

Tape Application & Molding: Apply Ortho-Glass tape in overlapping layers, molding it to the forearm’s shape. The PDF emphasizes maintaining neutral wrist and finger positions during the molding process. Refer to the manual for specific immobilization angles based on injury type.

Finger Splinting

Precision Immobilization: The Ortho-Glass Splinting Manual PDF details precise techniques for finger splinting, vital for treating fractures, dislocations, and tendon injuries. Begin with a finger stockinette, ensuring complete coverage of the affected digit and adjacent ones for stability.

Strategic Padding: Apply thin, even padding between the fingers to prevent skin maceration and promote comfort. The manual showcases optimal padding materials and placement for various finger injuries.

Tape Application & Shaping: Utilize narrow-width Ortho-Glass tape, applying it in a figure-of-eight pattern for secure immobilization. The PDF stresses maintaining natural joint alignment during molding, referencing specific angles for different finger injuries.

Ankle and Foot Splinting

Comprehensive Support: The Ortho-Glass Splinting Manual PDF provides detailed guidance on ankle and foot splinting, crucial for stabilizing fractures, sprains, and post-operative care. Begin with a well-fitted stockinette extending from the toes to mid-calf, ensuring smooth skin coverage.

Strategic Padding: Apply generous padding around the malleoli, Achilles tendon, and bony prominences to prevent pressure sores. The manual illustrates optimal padding distribution for diverse foot and ankle anatomies.

Tape Application & Molding: Utilize wider Ortho-Glass tape, applying it in overlapping layers to create a rigid, supportive shell. The PDF emphasizes maintaining neutral foot position during molding, referencing specific angles for optimal biomechanical alignment.

Post-Application Care and Monitoring

Essential Guidance: The Ortho-Glass Splinting Manual PDF details crucial post-application care, patient education, and monitoring for potential complications like compartment syndrome.

Follow instructions carefully!

Patient Education on Splint Care

Crucial Instructions: The Ortho-Glass Splinting Manual PDF emphasizes thorough patient education as a cornerstone of successful splinting. Explain the importance of keeping the splint clean and dry, avoiding submersion in water.

Instruct patients to elevate the affected limb to minimize swelling and to perform gentle range-of-motion exercises for unaffected joints. Detail signs of potential complications, such as increasing pain, numbness, tingling, or changes in skin color, and when to seek immediate medical attention.

Advise patients not to insert objects into the splint to scratch their skin, and to report any skin irritation or breakdown. Reinforce the importance of following all weight-bearing restrictions outlined by their healthcare provider.

Provide a written copy of these instructions for reference.

Signs of Complications (Compartment Syndrome, Skin Irritation)

The Ortho-Glass Splinting Manual PDF highlights recognizing potential complications. Compartment Syndrome requires immediate attention; educate patients about the “5 P’s”: pain (disproportionate to injury), pallor, paresthesia (numbness/tingling), pulselessness, and paralysis.

Report any of these symptoms immediately. Skin Irritation, including redness, blistering, or open sores under the splint, also demands prompt evaluation. Instruct patients to report any itching, burning, or foul odor.

Monitor for signs of pressure sores, especially over bony prominences. Emphasize that increasing pain, swelling, or changes in sensation warrant medical assessment. Early detection and intervention are crucial for preventing serious consequences.

Document all patient education regarding these warning signs.

Splint Removal Procedures

The Ortho-Glass Splinting Manual PDF details safe splint removal. Utilize a specialized cast saw with a side-cutting blade, ensuring slow and controlled movements. Avoid pressing down, as this can injure the skin. Cut along the length of the splint, spreading the blade to minimize vibration.

Protect the patient’s skin with a tongue depressor or similar barrier during cutting. Once split, gently pry the splint halves apart. Inspect the skin thoroughly for any signs of irritation, breakdown, or infection.

Cleanse the skin and apply a moisturizing lotion. Document the removal procedure and skin assessment. Instruct the patient on post-removal care, including range-of-motion exercises, as appropriate.

Dispose of the splint material properly.

Troubleshooting and Common Issues

The Ortho-Glass Splinting Manual PDF offers solutions for splint cracking, skin issues, and improper fit, ensuring optimal patient comfort and care.

Splint Cracking or Breakdown

Addressing Splint Integrity: The Ortho-Glass Splinting Manual PDF details causes for splint cracking, often stemming from excessive stress, improper application, or compromised material integrity. Inspect regularly for fissures or weak points.

Remedial Actions: Minor cracks may be reinforced with additional casting tape layers, carefully applied. However, significant breakdown necessitates complete splint removal and reapplication. Avoid attempting repairs with adhesives, as they can compromise skin health.

Preventative Measures: Ensure correct sizing, adequate padding, and gentle molding during application. Patient education regarding activity modification is crucial to prevent undue stress on the splint. Refer to the manual for detailed guidance on proper technique and material handling.

Skin Issues Under the Splint

Monitoring Skin Health: The Ortho-Glass Splinting Manual PDF emphasizes vigilant skin monitoring. Redness, blistering, or excessive moisture beneath the splint indicate potential problems. Prompt intervention is vital to prevent complications like skin breakdown or infection.

Addressing Concerns: If irritation occurs, elevate the limb and gently clean the area (as directed by a physician). Do not attempt to insert objects under the splint. The manual outlines safe splint modification techniques for improved ventilation.

Preventative Strategies: Proper stockinette application, adequate padding, and avoiding overly tight casting are crucial. Patient education on recognizing warning signs and reporting concerns is paramount. Consult the manual for detailed guidance on skin care and splint maintenance.

Improper Splint Fit

Addressing Fit Issues: The Ortho-Glass Splinting Manual PDF details recognizing an ill-fitting splint – signs include excessive pressure, numbness, tingling, or restricted movement. Immediate adjustment is crucial to prevent complications.

Modification Techniques: The manual provides guidance on safe splint adjustments, including carefully trimming edges or adding padding. Avoid forceful manipulation that could compromise the splint’s integrity.

Preventative Measures: Accurate limb measurements, appropriate stockinette and padding selection, and meticulous application technique are key. Proper molding during application ensures optimal fit. The manual stresses the importance of regular reassessment and patient feedback to ensure continued comfort and functionality.

Resources and Further Learning

Explore further! The Ortho-Glass Splinting Manual PDF directs you to orthopedic organizations, recommended readings, and online courses for continued skill development.

Relevant Orthopedic Organizations

Expanding your knowledge base requires connecting with leading orthopedic institutions. The Ortho-Glass Splinting Manual PDF highlights several key organizations dedicated to advancing musculoskeletal care and providing educational resources.

Consider exploring the American Academy of Orthopaedic Surgeons (AAOS), a premier source for orthopedic information, continuing medical education, and advocacy. Their website offers guidelines, research, and networking opportunities.

The American Society of Hand Surgeons (ASHS) is invaluable for those specializing in hand and upper extremity care, providing focused resources on splinting techniques and advancements. Additionally, investigate the Orthopedic Trauma Association (OTA) for insights into fracture management and immobilization strategies.

These organizations frequently offer workshops and certifications relevant to Ortho-Glass splinting, enhancing your proficiency and staying current with best practices.

Recommended Reading and Online Courses

Deepen your expertise beyond the Ortho-Glass Splinting Manual PDF with curated resources. Several textbooks offer comprehensive coverage of casting and splinting principles, including “Casting and Splinting Techniques” by Sinclair and “Rehabilitation of the Hand and Upper Extremity” by Hunter.

Online learning platforms provide convenient access to specialized courses. Consider exploring offerings from Coursera and Udemy, searching for keywords like “orthopedic splinting” or “casting techniques”.

Professional organizations, like the AAOS, often host webinars and online modules focused on practical splinting applications. Don’t overlook manufacturer-sponsored training programs for Ortho-Glass products, ensuring proper material usage and technique mastery.

Continuous education is vital for maintaining competency and delivering optimal patient care.

Where to Find Ortho-Glass Splinting Manuals (PDF)

Accessing the Ortho-Glass Splinting Manual PDF is straightforward. Begin by visiting the official website of the Ortho-Glass manufacturer – Breg is a primary source. Navigate to their support or resources section, where downloadable manuals are typically available.

Medical supply distributors, such as Medline or Henry Schein, often host PDF versions of product manuals on their websites for registered users. A quick online search using keywords like “Ortho-Glass splinting manual PDF download” will yield numerous results.

Professional orthopedic organizations may also archive manuals for members. Ensure the PDF you download is the latest version to reflect current best practices and product updates.

kenmore model 417 washer dryer combo repair manual

Kenmore Model 417 Washer Dryer Combo Repair Manual: A Comprehensive Guide

This manual provides detailed instructions for repairing your Kenmore 417 washer/dryer combo, offering diagrams, parts lists, and troubleshooting guidance for effective repair projects;

Understanding the Kenmore 417 Combo Unit

The Kenmore 417 is a versatile all-in-one washer and dryer, designed for convenience in smaller living spaces․ This unit combines washing and drying cycles within a single appliance, eliminating the need for separate machines․ Understanding its integrated functionality is crucial for effective repair․

Commonly, the Kenmore 417 features a variety of wash cycles, temperature settings, and drying options․ It utilizes a single drum for both processes, employing a ventless drying system to conserve energy and simplify installation․ The control panel allows users to select desired settings, and error codes are displayed to indicate potential issues․

Before attempting any repair, familiarize yourself with the unit’s basic components, including the water inlet valve, drain pump, heating element, drive belt, and door latch․ Knowing how these parts interact will streamline the troubleshooting and repair process․

Locating the Repair Manual & Model Information

Finding the correct repair manual for your Kenmore 417 Washer Dryer Combo is the first step towards successful troubleshooting․ Sears Parts Direct is a valuable resource, offering downloadable manuals and part diagrams specifically for this model․ You can also often find Kenmore Service Manuals available in PDF format online․

Accurate model information is essential․ Locate the model number – often found on a sticker inside the door, on the back of the unit, or within the user manual․ Common model numbers include 417․61722510 and 417․90802991․ Having this number ensures you access the correct repair information and order compatible replacement parts․

Many appliance repair websites also offer free DIY manuals and troubleshooting guides․ Searching online using your specific model number will yield the most relevant results․

Safety Precautions Before Repair

Prioritize safety before attempting any repair on your Kenmore 417 Washer Dryer Combo․ Disconnect the appliance from the power outlet – this is crucial to prevent electrical shock․ Turn off both the water supply valves to prevent flooding during washer component repair․

Wear appropriate safety gear, including gloves and eye protection․ Be mindful of sharp edges inside the appliance․ If you are unfamiliar with electrical work, consult a qualified technician․ Improper repair can lead to injury or further damage․

Never work on a wet surface․ Ensure the area around the appliance is dry and well-lit․ Always double-check that the power is off before touching any internal components․ Following these precautions will help ensure a safe repair process․

Common Problems & Troubleshooting

Kenmore 417 combo units can experience several common issues․ A washer not starting often points to a faulty door latch – ensure it’s securely closed․ A dryer failing to heat usually indicates a problem with the heating element or thermal fuse․ Excessive vibration during the wash cycle can stem from an unbalanced load or worn shock absorbers․

Water leaks frequently occur due to damaged hoses or a faulty water inlet valve․ Before assuming major issues, check for simple causes like overloaded drums or clogged drain pumps․ Consult the error codes displayed (see section on Error Codes) for specific diagnostic clues․

Regularly inspecting these areas can prevent minor problems from escalating into costly repairs․

Washer Not Starting

If your Kenmore 417 washer isn’t starting, the most frequent culprit is a malfunctioning door latch․ Verify the door is completely closed and latched; a slightly ajar door prevents operation․ If the latch appears functional, test its continuity with a multimeter – a lack of continuity indicates a faulty latch requiring replacement․

Another potential cause is a blown thermal fuse, protecting the motor from overheating․ Check the fuse for continuity as well․ A faulty control board can also prevent the washer from initiating a cycle․ Inspect wiring connections for looseness or damage․ Finally, ensure the unit is receiving power and the outlet is functioning correctly․

Dryer Not Heating

When the Kenmore 417 dryer fails to heat, the heating element is often the primary suspect․ Use a multimeter to test the element for continuity; a break in the circuit signifies a need for replacement․ Before testing, ensure the unit is disconnected from power․ Another common issue is a faulty thermal fuse, designed to prevent overheating․ Check its continuity as well․

Inspect the gas valve (for gas models) or the control board for proper operation․ A malfunctioning gas valve won’t allow gas flow, while a faulty control board may not send power to the heating element․ Also, examine the thermal bi-metal stat, which regulates temperature; a defective stat can interrupt the heating cycle․

Excessive Vibration During Wash Cycle

Excessive vibration during the wash cycle of your Kenmore 417 often indicates an unbalanced load․ Redistribute the clothes evenly within the drum․ However, persistent shaking suggests mechanical issues․ First, check the suspension rods or springs; these absorb shock and maintain stability․ Worn or broken components need replacement․

Inspect the shock absorbers for leaks or damage, as they contribute to dampening vibrations․ A failing drive belt can also cause imbalance․ Ensure the washer is level on the floor; adjust the feet as needed․ Finally, verify the drum bearings aren’t worn, as this can lead to significant wobble and noise during operation․

Water Leaks During Operation

Water leaks in your Kenmore 417 can stem from several sources․ Begin by inspecting the water inlet hoses and drain hose connections for tightness and cracks․ Check the door boot (gasket) for tears or debris preventing a proper seal․ A damaged boot is a common leak point․

Examine the pump housing and drain pump for cracks or loose connections․ Internal leaks might indicate a failing water inlet valve or a damaged tub seal․ Inspect the tub itself for any visible cracks․ Carefully observe where the leak originates during a wash cycle to pinpoint the issue․ Addressing these areas promptly prevents further water damage and ensures efficient operation․

Essential Tools for Repair

Successfully repairing your Kenmore 417 requires a basic toolkit․ A Phillips head screwdriver is crucial for most disassembly tasks․ A flathead screwdriver assists with prying and accessing certain components․ Pliers, both standard and needle-nose, are essential for gripping and manipulating parts․

A socket wrench set with various sizes provides leverage for removing bolts and fasteners․ A multimeter is vital for testing electrical components like the heating element and continuity․ Don’t forget a rubber mallet for gently loosening stuck parts․ Safety glasses and work gloves are paramount for personal protection․ Having these tools readily available streamlines the repair process․

Replacing the Door Latch Assembly

A faulty door latch prevents the Kenmore 417 from starting․ Begin by disconnecting power․ Remove the top panel for access․ Locate the latch assembly, typically near the door frame․ Disconnect the wiring harness connected to the latch․ Unscrew the latch from the machine’s frame – usually two screws secure it․

Carefully pull the old latch assembly out․ Install the new latch, ensuring proper alignment․ Reconnect the wiring harness securely․ Replace the screws, tightening them firmly․ Test the new latch by manually closing the door and verifying it engages․ Restore power and run a test cycle to confirm proper operation․

Diagnosing and Replacing the Water Inlet Valve

Insufficient water entering the Kenmore 417 often indicates a faulty water inlet valve․ First, disconnect power․ Locate the valve – usually at the back of the machine where water hoses connect․ Check the screen filters within the valve inlets for debris; clean if necessary․

To test, use a multimeter to check for continuity across the valve’s solenoid terminals when energized․ No continuity means replacement is needed․ Disconnect the hoses and electrical connections․ Remove the old valve, noting hose and wire routing․ Install the new valve, reconnecting hoses and wires securely․ Restore power and test for proper water flow during a wash cycle․

Cleaning the Drain Pump Filter

A clogged drain pump filter is a common cause of drainage issues in the Kenmore 417․ Locate the filter – typically behind a small access panel at the front, lower part of the machine․ Before opening, place towels to absorb any residual water․

Carefully unscrew and remove the filter․ Inspect for obstructions like lint, coins, or small objects․ Thoroughly clean the filter under running water, removing all debris․ Reinstall the filter, ensuring it’s securely tightened to prevent leaks․ Run a short spin cycle to verify proper drainage․ Regular cleaning – every few months – prevents future blockages and maintains optimal performance․

Checking and Replacing the Drive Belt

A worn or broken drive belt can prevent the drum from spinning․ To access the belt, you’ll likely need to remove the back panel of the Kenmore 417․ Visually inspect the belt for cracks, fraying, or signs of wear․ If damaged, proceed with replacement․

Before removing the old belt, note its routing around the motor pulley and drum․ Carefully detach the old belt and install the new one, ensuring it’s properly seated in the grooves․ Reassemble the back panel․ Test the washer by running a cycle to confirm the drum spins correctly․ A properly functioning drive belt is crucial for the wash and spin cycles․

Testing the Heating Element (Dryer)

A faulty heating element is a common cause of the dryer not heating․ Before testing, disconnect power to the Kenmore 417․ Locate the heating element housing, typically at the rear of the dryer․ Disconnect the wires connected to the element․

Using a multimeter set to the ohms setting, test the element for continuity․ A reading of zero or a low resistance indicates a good element․ An infinite reading signifies a broken element requiring replacement․ If replacing, ensure the new element is identical to the old one․ Reconnect the wires and restore power, then test the dryer’s heating function․

Understanding Error Codes

The Kenmore 417 utilizes error codes to diagnose internal issues․ These codes, displayed on the control panel, pinpoint the source of the problem, simplifying repairs․ Common codes include F01, indicating a water level sensor malfunction, potentially requiring sensor replacement or wiring checks․ E02 signals a drain pump malfunction, often due to blockage or pump failure – inspect the drain hose and pump itself․

Refer to the complete error code list in the service manual for a comprehensive understanding․ Resetting the machine by disconnecting power for a few minutes can sometimes clear minor errors․ However, persistent codes necessitate further investigation and potential part replacement․

Error Code F01: Water Level Sensor Issue

Error code F01 on the Kenmore 417 indicates a problem with the water level sensor, preventing accurate water filling․ This can manifest as the washer failing to start, overfilling, or not filling at all․ Troubleshooting begins with inspecting the sensor’s wiring harness for loose connections or damage․ A faulty sensor itself is a common cause, requiring replacement․

To test the sensor, use a multimeter to check its resistance; consult the service manual for correct values․ Before replacing, ensure the water inlet valve isn’t obstructed․ If the wiring and sensor test normal, the main control board might be the issue, though this is less frequent․

Error Code E02: Drain Pump Malfunction

Error code E02 on your Kenmore 417 signals a malfunction within the drain pump system․ This typically means the washer isn’t effectively removing water after a wash cycle․ Initial checks should focus on the drain pump filter for obstructions like lint, coins, or small articles of clothing – a frequent cause․

If the filter is clear, test the drain pump itself for continuity using a multimeter․ A lack of continuity indicates a failed pump needing replacement․ Also, inspect the pump’s wiring and connections for damage․ A blocked drain hose can mimic this error, so verify its clear path to the drain․ Finally, a faulty control board could also trigger this code․

Sourcing Replacement Parts

Finding replacement parts for your Kenmore 417 washer dryer combo is crucial for successful repairs․ Sears Parts Direct is a primary resource, offering a comprehensive catalog specifically tailored to Kenmore appliances, including detailed parts diagrams for your model․ You can also explore appliance parts retailers online, comparing prices and availability․

When ordering, always verify the part number matches your Kenmore 417’s specific configuration․ Providing the complete model number (e․g;, 417․61722510) ensures accuracy․ Local appliance repair shops may also stock common parts or can order them for you․ Consider checking online marketplaces, but prioritize reputable sellers to guarantee part quality and authenticity․

Disassembly and Reassembly Guide

Disassembly requires careful documentation; photograph each step to aid reassembly․ Begin by disconnecting power and water supply․ Access internal components by removing the top and front panels, noting screw locations․ Gently disconnect wiring harnesses, labeling them for correct reconnection․ When removing parts like the drum or pump, observe their orientation and surrounding components․

Reassembly follows the reverse order․ Ensure all wiring is securely connected, referencing your photos․ Verify proper alignment of parts before tightening screws․ Double-check for any forgotten components or loose connections․ Before restoring power, inspect for any obstructions or potential hazards․ A methodical approach prevents damage and ensures optimal performance․

Preventative Maintenance Tips

Regular cleaning is crucial; wipe down the exterior and door seal after each use․ Monthly, clean the lint filter thoroughly to maintain dryer efficiency and prevent fire hazards․ Every six months, run a cleaning cycle with a washing machine cleaner to remove residue and odors․ Inspect the water inlet hoses for cracks or leaks, replacing them as needed․

Annually, check the drain pump filter for obstructions․ Avoid overloading the machine, as this strains components․ Level the unit to minimize vibration․ Proper ventilation is vital for the dryer; ensure the exhaust vent is clear․ Following these tips extends the lifespan of your Kenmore 417 and minimizes potential repairs․

Where to Find Additional Support & Resources

Sears Parts Direct offers a wealth of information, including manuals, parts diagrams, and replacement parts specifically for your Kenmore 417․ Online appliance repair forums and communities provide a platform to connect with experienced users and technicians for advice․ YouTube hosts numerous video tutorials demonstrating common repair procedures for similar models․

Kenmore’s official website may have downloadable service manuals and FAQs․ Consider contacting a qualified appliance repair technician for complex issues․ Websites specializing in appliance repair offer expert help and troubleshooting guides․ Remember to have your model number readily available when seeking assistance to ensure accurate information and parts compatibility․

Electrical Diagram Overview

The Kenmore 417’s electrical system integrates both washer and dryer circuits; Diagrams illustrate the power supply, motor controls, heating element circuitry, and sensor connections․ Understanding these diagrams is crucial for diagnosing electrical faults․ Key components include the main control board, timer, door interlock switches, and wiring harnesses․

Troubleshooting requires a multimeter to test continuity, voltage, and resistance․ Safety is paramount; always disconnect power before working on electrical components․ Diagrams detail the grounding system and safety features․ Identifying the correct wire colors and connector types is essential for accurate repair․ Refer to the service manual for detailed schematics and component locations․

eq frequency guide

EQ Frequency Guide: A Comprehensive Overview (Updated 12/21/2025)

Today, December 21st, 2025, marks a pivotal moment in audio understanding, as we explore equalization—a tool for shaping sound, enhancing clarity, and achieving sonic perfection.

What is EQ and Why Use It?

Equalization (EQ) is the process of adjusting the volume of specific frequency ranges within an audio signal. Essentially, EQs take a signal with a particular frequency distribution and modify it, boosting or cutting energy at certain points. This manipulation is crucial for achieving a balanced and polished sound.

Why use EQ? The reasons are numerous. It can correct tonal imbalances, like muddiness or harshness. It enhances clarity, making instruments and vocals more distinct. EQ sculpts the sonic landscape, creating space for each element in a mix. Remember fiddling with a 10-band EQ to get the best sound?

Even excellent headphones benefit from EQ tweaking, as no two sets are created equal. Personal preference plays a huge role, and EQ allows you to tailor the sound to your ears and listening environment. It’s about refining the audio, not just changing it.

The Basics of Frequency and Hertz (Hz)

Frequency is a fundamental concept in audio, representing the number of cycles – or sonic vibrations – that occur per second. This is measured in Hertz (Hz). A higher frequency means more vibrations per second, perceived as a higher pitch. Conversely, a lower frequency equates to fewer vibrations, resulting in a lower pitch.

The human ear typically perceives frequencies ranging from 20Hz to 20kHz (20,000 Hz), though this range diminishes with age. Understanding this spectrum is vital for effective EQing. Lower frequencies (20Hz-250Hz) form the foundation of sound, while higher frequencies (4kHz-20kHz) contribute to air and brilliance.

When dealing with EQ settings, grasping frequency and Hertz is paramount. It allows you to pinpoint specific areas of the audio spectrum to adjust, enabling precise tonal shaping and a more refined listening experience.

Types of Equalizers: Graphic, Parametric, and Dynamic

Equalizers (EQs) come in diverse forms, each offering unique control over the frequency spectrum. Graphic EQs utilize fixed frequency bands with sliders to boost or cut specific ranges. They’re visually intuitive but offer limited precision.

Parametric EQs provide greater flexibility, allowing control over frequency, gain (boost/cut), and bandwidth (Q factor). This enables precise targeting of problem frequencies. They are favored for detailed mixing and mastering.

Dynamic EQs take equalization a step further by making frequency adjustments dependent on the signal’s level. This is incredibly useful for taming harsh resonances or adding clarity only when needed. They are a true life saver in certain mix situations.

Choosing the right EQ depends on the task at hand and desired level of control.

Understanding the Frequency Spectrum

Frequency, measured in Hertz (Hz), represents the rate of sound vibrations per second. The human ear generally perceives frequencies from 20Hz to 20kHz, though this range diminishes with age. Understanding this spectrum is crucial for effective equalization.

The spectrum is broadly divided into low, mid, and high frequencies. Low frequencies (20Hz ⸺ 250Hz) provide the foundational rumble and bass. Mid frequencies (250Hz ― 4kHz) contain the core of most instruments and vocals, defining their body and clarity.

High frequencies (4kHz ― 20kHz) add air, brilliance, and detail. Manipulating these ranges allows you to sculpt the overall tonal balance of your audio. EQs take a signal and output boosted or cut energy at certain points.

Low Frequencies (20Hz ― 250Hz): The Foundation

Low frequencies, spanning 20Hz to 250Hz, form the bedrock of your audio, delivering the power and depth that you physically feel. This range houses the fundamental tones of bass instruments like kick drums and bass guitars, providing the rhythmic pulse;

Careful EQing here is vital. Too much boost can create muddiness and a lack of definition, while excessive cuts can leave your track sounding thin and weak. Focus on clarity and control. Subtractive EQ is often preferred, removing unwanted rumble or resonances.

Consider the context; a hip-hop track will demand more low-end presence than a folk song. Precise adjustments in this range establish a solid foundation for the rest of your mix, ensuring impactful and balanced sound.

Mid Frequencies (250Hz ― 4kHz): Body and Definition

The mid-frequency range, from 250Hz to 4kHz, is where the majority of instruments and vocals reside, defining their character and intelligibility. This is where “body” and “definition” truly come to life, impacting how listeners perceive the core elements of your mix.

Around 500Hz-1kHz, you’ll find much of the fundamental energy of many instruments; boosting here can add warmth, but also muddiness. Cuts can clear up a crowded mix. The 2kHz-4kHz area is crucial for vocal clarity and presence – too much can sound harsh, too little, muffled.

Careful sculpting in the mids is essential for separation and ensuring each element has its own space. Dynamic EQ can be particularly useful here, addressing problematic frequencies only when they become prominent.

High Frequencies (4kHz ― 20kHz): Air and Brilliance

The high-frequency spectrum, spanning 4kHz to 20kHz, contributes to the “air” and “brilliance” of a sound, adding sparkle and a sense of openness. These frequencies are responsible for the subtle details that make a mix sound polished and professional, but require a delicate touch.

Boosting above 10kHz can add perceived spaciousness, especially with cymbals and vocals, but excessive boosts can introduce harshness or sibilance. Conversely, gentle cuts can tame overly bright sources. Modern headphones and speakers, being higher quality, reveal these nuances.

Remember, the human ear is less sensitive to these higher frequencies, so subtle adjustments often yield the best results. Careful EQing in this range can elevate a mix, making it sound more vibrant and engaging.

EQing for Common Instruments

Effective EQing hinges on understanding how different instruments occupy the frequency spectrum. Each instrument possesses unique characteristics requiring tailored adjustments for optimal clarity and separation within a mix. Mastering these techniques is crucial for achieving a professional sound.

Vocals often benefit from subtle boosts in the 2-5kHz range for presence, while taming harshness around 3kHz. Bass guitar needs punch around 60-80Hz and definition in the 250-500Hz range. Acoustic guitars thrive with gentle boosts in the midrange for warmth and clarity.

Drums require careful sculpting; kick drums need low-end power, snares benefit from midrange snap, and cymbals need controlled high-frequency air. Remember, subtractive EQ is often more effective than boosting, creating space and avoiding muddiness.

EQing Vocals for Clarity and Presence

Achieving vocal clarity and presence requires a nuanced approach to equalization. Begin by identifying and addressing any muddiness in the low-mid frequencies (200-500Hz), gently reducing these areas to create space for other instruments. A subtle boost between 2-5kHz can enhance articulation and intelligibility, bringing the vocals forward in the mix.

However, be cautious with this range, as excessive boosting can introduce harshness. Around 3kHz, carefully listen for any unpleasant resonances and apply narrow cuts to smooth them out. Sibilance (harsh ‘s’ sounds) can be tamed with a de-esser, or with precise cuts around 6-8kHz.

High-frequency air (above 10kHz) can add a sense of openness, but use sparingly. Remember, context is key – adjust EQ based on the vocalist’s tone and the song’s genre.

EQing Bass Guitar for Punch and Definition

Crafting a powerful and defined bass guitar tone hinges on strategic equalization. Focus initially on the fundamental frequencies, typically between 40-250Hz, to establish the instrument’s core weight and presence. A gentle boost around 60-80Hz can add substantial punch, but avoid overdoing it, as this can lead to muddiness.

To enhance clarity and definition, subtly boost frequencies in the 800Hz-1.5kHz range, focusing on the attack and pick definition. Conversely, reduce any boxiness or muddiness in the 250-500Hz region. Be mindful of interactions with the kick drum; carving out space for both instruments is crucial.

A touch of high-frequency boost (2-4kHz) can add subtle harmonic richness, but proceed cautiously to avoid harshness. Experimentation is key, tailoring the EQ to the specific bass and musical style.

EQing Acoustic Guitar for Natural Tone

Achieving a natural acoustic guitar tone with EQ requires a delicate touch, preserving its inherent warmth and clarity. Begin by addressing the low-end, gently rolling off frequencies below 120Hz to eliminate rumble and muddiness. A subtle boost around 150-250Hz can add body and fullness, but avoid excessive boosting, which can sound boomy.

The key to acoustic guitar clarity lies in the midrange. A gentle dip around 400-600Hz can reduce boxiness, while a subtle boost between 2-5kHz enhances articulation and presence. Pay attention to the instrument’s natural resonances and accentuate them, rather than fighting against them.

High-frequency air (8-12kHz) can add sparkle, but use it sparingly to avoid harshness. Remember, less is often more when EQing acoustic guitars.

EQing Drums for Impact and Separation

EQing drums is crucial for achieving a powerful and well-defined kit. For the kick drum, boost around 60-80Hz for thump and 3-5kHz for attack – be careful not to overdo it, as muddiness can quickly develop. Snares benefit from a boost around 200-300Hz for body and 5-8kHz for snap and crack.

To create separation, strategically cut frequencies where different drum elements clash. For example, reduce low-mid frequencies (250-500Hz) in the toms if they’re masking the kick. High-frequency boosts (8-12kHz) on cymbals add air and shimmer, but watch for harshness.

Remember, dynamic EQ can be incredibly useful for controlling transient peaks and maintaining a balanced sound.

EQing for Different Audio Sources

EQ isn’t a one-size-fits-all solution; different sources demand unique approaches. Headphones, for instance, often require EQ to compensate for their inherent frequency response and personalize the sound to individual preferences. Many users find EQ apps can dramatically improve the sound of existing headphones or earbuds.

Speakers, conversely, often need EQ for room correction. Room acoustics significantly impact sound, and EQ can help tame resonances or fill in dips in the frequency response. Before investing in new speakers, explore EQ options to optimize your current setup.

Ultimately, understanding the source’s characteristics is key to effective equalization, ensuring a balanced and enjoyable listening experience.

EQing Headphones for Personalized Sound

Headphones present a unique EQ challenge due to their close proximity to the ear and varying frequency responses. Even the best wired headphones benefit from subtle tweaking to match individual hearing profiles and preferences. A “pristine” sound out-of-the-box doesn’t always equate to your ideal sound.

Consider boosting frequencies where your headphones lack clarity or cutting those that sound harsh. Many users discover equalization apps can transform their existing headphones, making them sound like a more expensive pair. Experimentation is crucial!

Personalized EQ profiles allow you to tailor the sound to specific genres or even individual tracks, maximizing your listening enjoyment and revealing nuances you might have missed.

EQing Speakers for Room Correction

Unlike headphones, speakers are heavily influenced by the acoustics of the listening environment. Room reflections, boundaries, and furniture all contribute to uneven frequency responses, creating peaks and dips in the sound. EQing speakers, therefore, often focuses on room correction – compensating for these acoustic anomalies.

Identifying problematic frequencies often requires measurement tools or careful listening. Boosting frequencies that are diminished by room absorption, or cutting those amplified by reflections, can dramatically improve clarity and balance.

Remember, EQ is not a substitute for proper speaker placement and acoustic treatment, but it’s a powerful tool for refining the sound within a given space, achieving a more accurate and enjoyable listening experience.

Dynamic EQ: Level-Dependent Frequency Adjustments

Traditional EQ applies static adjustments to frequencies, meaning the boost or cut remains constant regardless of the signal’s volume. Dynamic EQ, however, introduces a level-dependent element, reacting to the incoming signal’s amplitude. This allows for surgical precision, addressing issues that only manifest at certain volume levels.

For example, a resonant frequency might become harsh during louder passages. A dynamic EQ can automatically reduce that frequency only when it crosses a defined threshold, leaving the quieter parts unaffected. This is a true life saver in certain mix situations.

It’s a sophisticated tool, offering nuanced control and preventing over-correction, ultimately resulting in a more natural and polished sound.

Common EQ Mistakes to Avoid

One frequent error is excessive boosting, often leading to a muddy or harsh sound. Remember, boosting amplifies not only the desired frequencies but also any unwanted noise present. Prioritize subtractive EQ – cutting problematic frequencies – for a cleaner result.

Another common mistake is applying broad EQ curves when precise adjustments are needed. Narrow, surgical cuts are often more effective than sweeping boosts or cuts across large frequency ranges. Avoid “EQing in solo”; always assess changes within the context of the full mix.

Finally, resist the urge to drastically alter the sound; subtle adjustments are usually more impactful and maintain the natural character of the audio source.

Using EQ in Mixing and Mastering

During mixing, EQ serves a corrective and creative role. It clarifies individual instrument frequencies, preventing muddiness and frequency masking, ensuring each element has its sonic space. Use EQ to sculpt tones, enhancing desirable characteristics and taming harshness, always considering the overall mix balance.

In mastering, EQ is more subtle, focusing on broad tonal shaping and final polish. It addresses minor imbalances and enhances the overall sonic cohesion of the track. Mastering EQ often involves gentle, wide-band adjustments to improve clarity and loudness.

Remember, mastering EQ should complement the mix, not attempt to fix fundamental issues. A well-mixed track requires minimal mastering EQ.

EQ Plugins and Software Options

The digital audio workstation (DAW) landscape offers a vast array of EQ plugins. Many DAWs include stock EQs, ranging from simple graphic EQs to versatile parametric and dynamic EQs, providing a solid starting point for most mixing tasks.

Third-party plugins expand these options significantly. Popular choices include FabFilter Pro-Q 3, known for its visual interface and precise control; Waves Renaissance EQ, emulating classic analog EQs; and iZotope Ozone EQ, integrated within a mastering suite.

Consider plugin type based on needs: graphic EQs for broad adjustments, parametric for surgical precision, and dynamic EQs for level-dependent shaping. Experimentation is key to finding tools that suit your workflow and sonic preferences.

The Importance of Subtractive EQ

Subtractive equalization, the art of reducing unwanted frequencies, is often more effective than boosting. Adding frequencies can introduce harshness or muddiness, while cutting problematic areas cleans up the mix and creates space for instruments to breathe.

Identify resonant frequencies or muddiness by sweeping narrow cuts across the spectrum. Focus on removing frequencies that clash or mask other elements. A gentle, surgical approach yields more natural results than broad, aggressive boosts.

Prioritize clarity and separation. Removing low-mid frequencies from vocals can improve intelligibility, while cutting boxiness from guitars enhances their presence. Subtractive EQ is a foundational mixing technique.

EQ and the Human Ear: Perception and Psychoacoustics

Our perception of frequency isn’t linear; the human ear is more sensitive to certain ranges. Understanding this is crucial for effective EQing. We perceive mid-frequencies (around 1kHz-4kHz) as particularly important for speech intelligibility and instrument definition.

Psychoacoustics reveals how our brains interpret sound. Equal loudness contours demonstrate that we need more energy at lower frequencies to perceive them as equally loud as higher frequencies. This impacts EQ decisions – a small boost in the bass can sound significantly louder.

Masking occurs when louder sounds obscure quieter ones. EQ can minimize masking by carving out space for each instrument, ensuring clarity and balance. Consider Fletcher-Munson curves when making adjustments.

Microphone Selection and its Impact on EQ Needs

The microphone you choose fundamentally shapes the sound entering your recording chain, directly influencing subsequent EQ requirements. Different microphones possess unique frequency responses; some excel at capturing warmth, while others prioritize clarity and detail.

A microphone with a pronounced low-end boost might necessitate subtractive EQ to prevent muddiness, whereas a brighter microphone could benefit from a gentle low-frequency lift. Understanding a microphone’s inherent characteristics is paramount.

Whether utilizing a computer’s built-in array, a USB microphone, an audio interface, or a dedicated headset, the microphone’s sonic signature dictates the initial tonal balance. Careful microphone selection minimizes the need for extensive EQ correction later in the mixing process.

Golden Age of Audio: High-Quality Headphones and Speakers

We currently reside in a remarkable era for audio reproduction, witnessing unprecedented accessibility to high-quality headphones, earbuds, and speakers. This proliferation of superior listening devices dramatically impacts how we perceive and utilize equalization.

Previously, compensating for subpar playback systems often required drastic EQ adjustments. Now, with more accurate and detailed reproduction, subtle EQ moves become more effective, enhancing rather than masking inherent sonic qualities.

Investing in quality monitoring tools—headphones and speakers—reveals nuances previously obscured, allowing for more informed and precise EQ decisions. Before extensive EQ, consider if improved playback can achieve the desired sound.

tv guide anderson sc

TV Guide Anderson‚ SC: Comprehensive Listings & Information (December 21‚ 2025)

Today‚ December 21‚ 2025‚ at 00:45:21‚ Anderson‚ SC viewers have diverse options‚ including local channels and streaming.
Several players named Anderson are currently active in professional football‚ impacting global sports programming.

Understanding Local TV in Anderson‚ SC

Anderson‚ South Carolina‚ benefits from a blend of established broadcast networks and emerging digital alternatives for television viewing. As of December 21‚ 2025‚ residents can access programming through traditional cable and satellite providers‚ as well as increasingly popular streaming services. The local television landscape is anchored by several key affiliate stations‚ delivering news‚ entertainment‚ and sports content.

Notably‚ multiple individuals named Anderson are currently making waves in the world of professional football – Elliot Anderson with Nottingham Forest‚ Felipe Anderson with SE Palmeiras‚ and others. While seemingly unrelated to local TV‚ this highlights the broad reach of sports programming available to Anderson viewers. Understanding the available options requires considering factors like channel lineups‚ package costs‚ and individual viewing preferences.

Furthermore‚ the presence of players like Anderson Duarte and Anderson Rodríguez in transfer discussions suggests a dynamic sports media environment. Local channels provide crucial community information‚ while national networks offer a wider range of programming choices. The evolving TV market in Anderson demands informed consumer decisions.

Available TV Providers in Anderson‚ SC

Anderson‚ SC residents have several options for television service as of December 21‚ 2025. Traditional providers like Spectrum offer comprehensive cable packages‚ bundling TV with internet and phone services. Satellite options‚ including DISH Network and DIRECTV‚ provide wider coverage areas and diverse channel lineups‚ often appealing to those in more rural parts of the county.

However‚ the landscape is shifting with the rise of streaming services. While not traditional providers‚ platforms like Netflix‚ Hulu‚ and Disney+ are increasingly viable alternatives‚ offering on-demand content and live TV options. The presence of multiple “Anderson” players in professional football – Elliot‚ Felipe‚ Duarte‚ and Rodriguez – demonstrates the breadth of sports content available through these providers.

Choosing the right provider depends on individual needs and budget. Factors to consider include channel preferences‚ internet speed requirements for streaming‚ and desired features like DVR capabilities. Comparing package costs and promotional offers is crucial for making an informed decision in the evolving Anderson TV market.

Cable TV Options: Spectrum & Others

Spectrum is a primary cable provider in Anderson‚ SC‚ offering a range of packages as of December 21‚ 2025. These typically include local channels – WYFF (NBC)‚ WSPA (CBS)‚ WLOS (ABC)‚ and FOX Carolina – alongside national networks and popular cable channels. Spectrum often bundles services‚ combining TV with high-speed internet and phone lines for potential cost savings.

While Spectrum dominates‚ other smaller cable providers may serve specific areas within Anderson County. These alternatives often focus on providing basic cable packages with a limited channel selection at a lower price point. The availability of these providers varies depending on location.

Considering the diverse “Anderson” athletes currently active in football – from Elliot Anderson in Nottingham to Felipe Anderson in Brazil – cable packages offer extensive sports programming. However‚ viewers should carefully review channel lineups to ensure they include desired sports networks. Comparing Spectrum’s offerings with those of any local alternatives is essential for finding the best fit.

Satellite TV Options: DISH Network & DIRECTV

DISH Network and DIRECTV represent the primary satellite television providers serving Anderson‚ SC‚ as of December 21‚ 2025. Both offer extensive channel lineups‚ often exceeding those of cable providers‚ including local affiliates like WYFF‚ WSPA‚ WLOS‚ and FOX Carolina. Satellite TV is particularly advantageous for residents in areas with limited cable access.

DIRECTV generally positions itself as a premium service‚ emphasizing exclusive content and advanced DVR capabilities. DISH Network often focuses on competitive pricing and innovative features like voice control. Both providers offer a variety of packages tailored to different viewing preferences.

Considering the global presence of athletes named “Anderson” – spanning from England’s Elliot Anderson to Brazil’s Felipe Anderson – satellite services deliver comprehensive sports coverage. However‚ potential drawbacks include susceptibility to weather interference and the need for a clear line of sight to the satellite. Careful consideration of these factors is crucial.

Streaming Services as Alternatives to Cable/Satellite

As of December 21‚ 2025‚ Anderson‚ SC residents have a growing array of streaming services offering viable alternatives to traditional cable and satellite television. These platforms‚ including Netflix‚ Hulu‚ Disney+‚ and YouTube TV‚ provide on-demand access to a vast library of content‚ often at a lower monthly cost.

Streaming eliminates the need for long-term contracts and equipment installations. Many services offer live TV packages that include local channels like WYFF‚ WSPA‚ WLOS‚ and FOX Carolina‚ mirroring traditional TV lineups. The flexibility to watch on multiple devices – smartphones‚ tablets‚ smart TVs – is a significant advantage.

However‚ streaming requires a reliable high-speed internet connection. Considering the diverse athletic talent globally represented by individuals named “Anderson‚” streaming provides access to sports content. Data caps and potential buffering issues are considerations. The evolving landscape of streaming continues to reshape TV viewing habits in Anderson‚ SC.

Local Channels Available in Anderson‚ SC

Anderson‚ SC viewers have access to several key local television channels as of December 21‚ 2025. Channel 4 (WYFF) broadcasts NBC programming‚ delivering local news‚ weather‚ and national shows. Channel 7 (WSPA) is the local CBS affiliate‚ offering similar content with a CBS network focus.

For ABC viewers‚ Channel 21 (WLOS) provides network and local programming. Sports enthusiasts can tune into Channel 39 (FOX Carolina)‚ the FOX affiliate‚ for live sports broadcasts and entertainment. These channels are crucial for staying informed about local events and emergencies.

Beyond these primary channels‚ access to additional sub-channels and digital broadcasts expands viewing options. The presence of multiple “Anderson” athletes across various sports globally highlights the importance of local access to sports programming. Over-the-air reception and streaming services also offer access to these channels.

Channel 4 (WYFF) ⏤ NBC Affiliate

As Anderson‚ SC’s NBC affiliate‚ Channel 4 (WYFF) delivers a blend of national NBC programming and crucial local content as of December 21‚ 2025. Viewers can expect daily news broadcasts covering Anderson County and the surrounding Upstate region‚ providing updates on local events‚ weather‚ and community initiatives.

Alongside network shows‚ WYFF prioritizes local investigations and in-depth reporting. The station also broadcasts popular NBC programs like “Today‚” “NBC Nightly News‚” and prime-time dramas and comedies. Sports fans can find coverage of national sporting events aired on NBC.

Interestingly‚ the name “Anderson” appears frequently in professional sports‚ mirroring the local community’s engagement with athletic programming. WYFF’s digital platforms extend access to news and content beyond traditional broadcast‚ offering live streams and on-demand viewing options.

Channel 7 (WSPA) ⏤ CBS Affiliate

Channel 7 (WSPA)‚ the CBS affiliate serving Anderson‚ SC‚ provides a diverse programming lineup as of December 21‚ 2025. Local news coverage is a cornerstone‚ featuring reports on Anderson County’s happenings‚ including government‚ education‚ and local businesses. WSPA’s commitment extends to severe weather updates‚ ensuring community safety.

Alongside CBS network programming – such as “CBS Mornings‚” “The CBS Evening News‚” and popular entertainment shows – WSPA broadcasts syndicated content and local productions. Sports enthusiasts can enjoy CBS Sports broadcasts‚ including NFL football and college basketball. The station also offers investigative journalism and community-focused segments.

The prevalence of the name “Anderson” in various sports contexts highlights the community’s passion for athletics‚ which WSPA acknowledges through its sports coverage. Digital platforms enhance accessibility‚ offering live streams and on-demand content.

Channel 21 (WLOS) ‒ ABC Affiliate

Channel 21 (WLOS)‚ the ABC affiliate reaching Anderson‚ SC‚ delivers a blend of national and local programming on December 21‚ 2025. Viewers can expect ABC’s primetime lineup‚ including dramas‚ comedies‚ and reality shows‚ alongside comprehensive local news coverage. WLOS prioritizes reporting on Anderson County events‚ focusing on local government‚ schools‚ and community initiatives.

The station’s news team provides in-depth investigations and breaking news alerts‚ with a strong emphasis on weather forecasting‚ crucial for the region. Sports programming includes coverage of college and professional athletics‚ aligning with the broader sports interest reflected in names like Elliot Anderson’s prominence in football.

WLOS also broadcasts syndicated programs and offers digital streaming options‚ enhancing accessibility. Community involvement is a key focus‚ with features highlighting local achievements and events.

Channel 39 (FOX Carolina) ‒ FOX Affiliate

Channel 39 (FOX Carolina) serves Anderson‚ SC‚ with a diverse programming schedule on December 21‚ 2025. The station broadcasts FOX’s national lineup‚ featuring popular dramas‚ comedies‚ and live sports events. Alongside network programming‚ FOX Carolina delivers extensive local news coverage‚ focusing on Anderson County and the surrounding areas.

Their news team emphasizes investigative reporting and breaking news‚ providing timely updates on local government‚ crime‚ and community affairs. Weather forecasts are a crucial component‚ particularly relevant given the region’s climate. Sports coverage extends to both professional and collegiate athletics‚ mirroring the athletic focus seen with figures like Elliot Anderson.

FOX Carolina also airs syndicated shows and offers digital streaming options for convenient viewing. The station actively engages with the community through local event coverage and public service announcements.

Anderson‚ SC TV Schedule Highlights (December 21‚ 2025)

December 21‚ 2025‚ presents a varied TV landscape in Anderson‚ SC; Morning programming features local news on all major affiliates‚ followed by daytime talk shows and game shows. Primetime boasts network premieres and highly-rated series across NBC‚ CBS‚ ABC‚ and FOX. Sports enthusiasts can anticipate potential NFL or college basketball games depending on the day’s schedule.

Notably‚ the prominence of athletes named Anderson – like Elliot Anderson in football and Felipe Anderson – suggests sports programming will be a key draw. Local channels will likely feature holiday-themed specials and community event coverage. Streaming services offer on-demand options and original content‚ providing alternatives to traditional broadcast schedules.

Late-night programming includes talk shows and reruns‚ catering to diverse viewing preferences. Check local listings for specific times and channel details.

Sports Programming Available in Anderson‚ SC

Anderson‚ SC‚ sports fans have a robust selection of programming options on December 21‚ 2025. National networks like ESPN‚ Fox Sports‚ and CBS Sports are readily available through cable‚ satellite‚ and streaming services. Local affiliates often broadcast regional college sports‚ potentially including games from nearby universities.

The current prominence of footballers named Anderson – Elliot Anderson (Nottingham Forest) and Felipe Anderson (SE Palmeiras) – suggests increased interest in international soccer coverage. Expect potential broadcasts of Premier League‚ La Liga‚ or other major league matches.

NFL and NBA games are staples of sports programming‚ alongside college football and basketball. Streaming services offer specialized sports packages‚ providing access to niche sports and live events. Local sports bars will also be showcasing key games‚ creating a communal viewing experience.

News Coverage in Anderson‚ SC: Local & National

Anderson‚ SC residents have access to a comprehensive range of news coverage on December 21‚ 2025. Local channels‚ including WYFF (Channel 4 ⏤ NBC)‚ WSPA (Channel 7 ⏤ CBS)‚ WLOS (Channel 21 ‒ ABC)‚ and FOX Carolina (Channel 39)‚ deliver regional news‚ weather‚ and community updates.

National news is readily available through major networks like CNN‚ MSNBC‚ and Fox News‚ accessible via cable and satellite providers. Streaming services also offer 24/7 news channels and on-demand news segments; The prominence of individuals named Anderson in various fields—from sports (Elliot‚ Felipe) to other areas—may occasionally feature in national news cycles.

Local newspapers’ websites often integrate with TV news broadcasts‚ providing a multi-platform news experience. Online news aggregators and social media platforms also contribute to the flow of information‚ offering diverse perspectives on current events.

Spanish-Language TV Options in Anderson‚ SC

For Spanish-speaking residents of Anderson‚ SC‚ several television options are available as of December 21‚ 2025. Major providers like Spectrum‚ DISH Network‚ and DIRECTV typically offer packages including Spanish-language channels such as Univision‚ Telemundo‚ and CNN en Español.

These channels broadcast a variety of programming‚ including news‚ telenovelas‚ sports‚ and entertainment shows. Streaming services also provide access to Spanish-language content‚ with platforms like VIX and Pantaya offering extensive libraries of movies and series.

Interestingly‚ the name “Anderson” appears in connection with several international footballers‚ like Felipe Anderson from Brazil‚ potentially featured on sports broadcasts. Local antenna reception may also pick up some Spanish-language broadcasts depending on proximity to transmission towers.

Anderson‚ SC TV Guide for Specific Genres (Movies‚ Drama‚ Comedy)

On December 21‚ 2025‚ Anderson‚ SC viewers seeking specific genres have numerous options. For movie enthusiasts‚ channels like TCM and various streaming platforms (Netflix‚ Hulu‚ Amazon Prime) offer a wide selection‚ from classic films to new releases. Drama fans can tune into networks like HBO and FX‚ or explore dramatic series on streaming services.

Comedy programming is readily available on channels such as Comedy Central and TBS‚ alongside sitcoms and stand-up specials on streaming platforms. Interestingly‚ the name “Anderson” is linked to several footballers‚ potentially appearing in sports-related programming. Local channels also occasionally feature genre-specific movie nights.

Checking online TV guides and provider listings is crucial for precise scheduling. Remember to explore both cable/satellite and streaming options for the most comprehensive selection.

How to Access TV Guides Online & Through Apps

Anderson‚ SC residents have multiple avenues for accessing TV guides. Traditional printed guides are becoming less common‚ but numerous online resources provide comprehensive listings. Websites like TVGuide.com‚ Zap2it‚ and local provider websites (Spectrum‚ DISH‚ DIRECTV) offer searchable schedules.

Furthermore‚ most TV providers offer dedicated mobile apps allowing users to browse channels‚ set reminders‚ and even control their DVR remotely. Streaming services like Netflix‚ Hulu‚ and Amazon Prime Video have built-in guides showcasing their content.

Interestingly‚ the name “Anderson” appears frequently in sports‚ so sports-specific apps are also useful. Utilizing voice assistants (Siri‚ Alexa‚ Google Assistant) can also quickly retrieve program information. Remember today’s date‚ December 21‚ 2025‚ when searching for specific broadcasts.

Troubleshooting Common TV Reception Issues in Anderson‚ SC

Anderson‚ SC viewers may encounter occasional TV reception problems. Common issues include pixelation‚ freezing‚ or complete signal loss. First‚ check all cable connections to ensure they are secure. For antenna users (OTA)‚ repositioning the antenna can often improve reception‚ especially during inclement weather.

If using satellite (DISH or DIRECTV)‚ obstructions like trees or heavy snow can disrupt the signal. Contacting your provider for assistance is recommended. Cable subscribers should verify their set-top box is functioning correctly and consider a reboot.

Interestingly‚ the multiple “Andersons” in sports highlight the importance of reliable viewing! Remember today is December 21‚ 2025. Online TV guides can help confirm scheduled broadcasts are actually airing. Finally‚ check provider outage maps for reported service disruptions in the Anderson area.

Comparing TV Package Costs in Anderson‚ SC

Anderson‚ SC residents have several options for TV service‚ each with varying costs. Spectrum typically offers bundled packages including internet and phone‚ starting around $100/month‚ but prices fluctuate. DISH Network and DIRECTV‚ satellite providers‚ often require professional installation fees‚ with monthly costs ranging from $60 to $150+‚ depending on channel selection.

Streaming services like Hulu + Live TV‚ YouTube TV‚ and Sling TV present more affordable alternatives‚ generally between $40 and $75/month. However‚ these require a reliable internet connection. Considering today’s date‚ December 21‚ 2025‚ promotional offers are frequently available.

Remember the numerous “Andersons” in football – viewing them requires a good package! Carefully compare channel lineups‚ DVR capabilities‚ and contract terms before committing to a provider. Don’t forget to factor in equipment rental fees and potential price increases.

Anderson‚ SC: Over-the-Air (OTA) TV Reception

For Anderson‚ SC residents‚ Over-the-Air (OTA) TV reception offers a free alternative to cable or satellite. Utilizing a digital antenna‚ viewers can access local channels like WYFF (Channel 4 ⏤ NBC)‚ WSPA (Channel 7 ‒ CBS)‚ WLOS (Channel 21 ⏤ ABC)‚ and FOX Carolina (Channel 39 ⏤ FOX). Signal strength varies based on location and antenna quality.

Considering today‚ December 21‚ 2025‚ digital transitions have improved signal clarity. However‚ obstructions like trees or buildings can impact reception. Several online resources map broadcast tower locations to help optimize antenna placement. Remember the multiple “Andersons” playing professional sports – you’ll need a clear signal to watch!

OTA reception doesn’t include regional sports networks or many cable-exclusive channels. A good antenna and occasional rescan are key to maximizing free local programming.

TV Guide Resources Specific to Anderson‚ SC

Anderson‚ SC residents seeking comprehensive TV listings have several resources available. While a dedicated‚ hyper-local TV guide is currently unavailable‚ national providers offer zip code-specific schedules. Websites like TVGuide.com and Zap2it allow users to input “Anderson‚ SC” to view channel lineups and program times for available providers – Spectrum‚ DISH‚ and DIRECTV.

Furthermore‚ many local channels‚ such as WYFF‚ WSPA‚ WLOS‚ and FOX Carolina‚ maintain online schedules on their respective websites. These often include detailed program descriptions and air times. Remember today’s date‚ December 21‚ 2025‚ when searching for specific event listings.

Don’t forget to explore provider-specific apps‚ offering interactive guides and on-demand content. Considering the numerous “Andersons” in sports‚ these resources help track game schedules!

Future of TV Viewing in Anderson‚ SC (Streaming Trends)

The future of television in Anderson‚ SC‚ is undeniably shifting towards streaming. Traditional cable and satellite subscriptions are facing increasing competition from services like Netflix‚ Hulu‚ and Disney+. This trend is accelerating‚ offering viewers greater flexibility and on-demand access to content.

As of December 21‚ 2025‚ cord-cutting continues to rise‚ driven by cost savings and personalized viewing experiences. Local providers are adapting by offering streaming bundles or internet-only packages. The numerous “Anderson” athletes featured on sports channels are increasingly viewed via streaming platforms.

Expect further integration of streaming apps into smart TVs and devices. Interactive TV guides will likely become more sophisticated‚ utilizing AI to recommend content based on viewing habits. Over-the-air (OTA) reception may remain a viable option for local channels‚ but streaming will dominate the landscape.

time series analysis hamilton pdf

Hamilton’s comprehensive PDF delves into the core of time series analysis, offering a robust foundation for understanding and applying statistical methods to sequential data.

This resource, alongside Shumway and Stoffer’s manual, provides essential tools for forecasting and modeling, covering topics from stationarity to advanced techniques.

Overview of Time Series Data

Time series data, central to Hamilton’s work and related resources, consists of observations indexed in time order. These sequences, whether representing financial markets, economic indicators, or signal processing outputs, demand specialized analytical techniques.

Understanding the inherent temporal dependence within these datasets is crucial. The Hamilton textbook, alongside supplementary materials, emphasizes recognizing patterns, trends, and seasonality. Analyzing this data requires considering factors like autocorrelation and employing methods like spectral analysis, as detailed in the PDF and related texts.

Significance of Time Series Analysis

Time series analysis, thoroughly explored in Hamilton’s textbook and supporting PDF resources, holds immense practical value across diverse fields. Accurate forecasting, a key application, drives critical decisions in financial markets and economic modeling.

Beyond prediction, it enables a deeper understanding of underlying processes, informing signal processing and control systems. The ability to model and interpret temporal dependencies, as emphasized by Hamilton, is vital for identifying trends, detecting anomalies, and optimizing strategies. This analysis is essential for informed decision-making.

Core Concepts in Hamilton’s Approach

Hamilton’s approach centers on stationarity, autocorrelation, and the Wold representation theorem, providing a rigorous framework for analyzing and modeling time series data.

Stationarity and Non-Stationarity

Hamilton’s text meticulously examines stationarity, a crucial property in time series analysis. A stationary series exhibits constant statistical properties—mean, variance, and autocorrelation—over time. Conversely, non-stationary series display changing characteristics, necessitating transformations like differencing to achieve stationarity.

Understanding this distinction is paramount, as many time series models assume stationarity. The PDF details methods for testing stationarity and addresses the implications of non-stationarity for forecasting and model building. Properly addressing non-stationarity ensures reliable and meaningful results from subsequent analyses.

Autocorrelation and Partial Autocorrelation Functions (ACF & PACF)

Hamilton’s approach heavily utilizes Autocorrelation Functions (ACF) and Partial Autocorrelation Functions (PACF) for time series model identification. The ACF measures correlation between a series and its lagged values, revealing patterns of dependence. PACF isolates the direct correlation between observations, removing indirect effects through intervening lags.

The PDF demonstrates how to interpret ACF and PACF plots to determine the appropriate orders (p, q) for AR and MA models. These functions are vital diagnostic tools, guiding model selection and ensuring a good fit to the data, ultimately improving forecasting accuracy.

The Wold Representation Theorem

Hamilton’s text dedicates significant attention to the Wold Representation Theorem, a cornerstone of time series analysis. This theorem establishes that any stationary time series can be expressed as an infinite weighted sum of past shocks (innovations). The PDF clarifies how this decomposition is fundamental for understanding the series’ structure.

It demonstrates that the weights are determined by the autocovariance function, linking the theorem to ACF analysis. Understanding this representation is crucial for model building, forecasting, and interpreting the underlying dynamics driving the observed data, providing a theoretical basis for ARIMA modeling.

ARIMA Models

Hamilton’s PDF meticulously explains ARIMA models – Autoregressive Integrated Moving Average – as powerful tools for time series analysis and forecasting, building upon core concepts.

Understanding AR (Autoregressive) Models

Hamilton’s text provides a detailed exploration of Autoregressive (AR) models, fundamental to time series analysis. These models predict future values based on a linear combination of past values.

The PDF clarifies how AR models utilize autocorrelation, representing the relationship between a variable and its lagged values. Understanding the order ‘p’ – the number of lagged values included – is crucial.

Hamilton explains the mathematical formulation and interpretation of AR processes, laying the groundwork for more complex time series techniques. This section is vital for grasping the core principles of forecasting using historical data.

Understanding MA (Moving Average) Models

Hamilton’s approach to Moving Average (MA) models, detailed within the PDF, presents them as another cornerstone of time series analysis. MA models express a value as a linear combination of past forecast errors – the differences between predicted and actual values.

The text elucidates how MA models capture short-term fluctuations and dependencies. The order ‘q’ defines the number of lagged error terms included.

Hamilton meticulously explains the mathematical representation and properties of MA processes, preparing readers for combining them with AR models to create powerful ARIMA models for robust forecasting.

Combining AR and MA: The ARIMA Model

Hamilton’s text expertly bridges Autoregressive (AR) and Moving Average (MA) models, introducing the powerful Autoregressive Integrated Moving Average (ARIMA) framework within the PDF. ARIMA models, denoted as ARIMA(p, d, q), integrate past values (AR), lagged forecast errors (MA), and differencing (I) to achieve stationarity.

The PDF meticulously details how to identify appropriate (p, d, q) orders using ACF and PACF plots.

Hamilton emphasizes the ARIMA model’s flexibility in capturing diverse time series patterns, making it a central tool for forecasting and analysis.

Model Identification and Estimation

Hamilton’s PDF details identifying optimal ARIMA model orders via ACF/PACF analysis, then employing Maximum Likelihood Estimation (MLE) for parameter precision.

This ensures robust and accurate time series modeling.

Identifying the Appropriate ARIMA Model Order

Hamilton’s text emphasizes utilizing Autocorrelation Function (ACF) and Partial Autocorrelation Function (PACF) plots as crucial diagnostic tools. These plots visually reveal the correlation structure within the time series data, guiding the selection of appropriate AR and MA components.

Determining the ‘p’ (AR order) and ‘q’ (MA order) involves analyzing the significant lags displayed in these functions. A sharp cutoff in the ACF suggests an MA process, while a cutoff in the PACF indicates an AR process. Careful interpretation, combined with information criteria like AIC or BIC, helps pinpoint the most parsimonious and effective model order for accurate forecasting and analysis, as detailed within the PDF.

Maximum Likelihood Estimation (MLE) in Time Series

Hamilton’s approach heavily features Maximum Likelihood Estimation (MLE) for parameter estimation within time series models. MLE seeks parameter values that maximize the likelihood of observing the given data, assuming a specific model structure.

The PDF details how MLE is applied to AR, MA, and ARIMA models, often involving iterative optimization algorithms. This method provides statistically efficient estimates, crucial for accurate forecasting and inference. Understanding the likelihood function and its properties, as explained in the text, is fundamental for robust model fitting and validation, ensuring reliable results from your time series analysis.

Advanced Topics Covered in the PDF

Hamilton’s text extends beyond ARIMA models, exploring state-space models, GARCH for volatility, and spectral analysis with the periodogram—complex techniques for nuanced time series work.

State-Space Models

Hamilton’s treatment of state-space models provides a powerful framework for analyzing time series data where the underlying system evolves unobservably. These models represent the system using unobserved ‘state’ variables, linked by transition equations, and observed through measurement equations.

This approach allows for handling missing data, incorporating time-varying parameters, and modeling complex dependencies. Kalman filtering and smoothing are key techniques discussed for estimating the states and parameters. The PDF details how these models extend beyond traditional ARIMA frameworks, offering flexibility for diverse applications in econometrics and beyond, enabling a deeper understanding of dynamic systems.

GARCH Models for Volatility

Hamilton’s exploration of Generalized Autoregressive Conditional Heteroskedasticity (GARCH) models addresses a critical aspect of time series analysis: volatility clustering. These models capture the tendency of large changes to be followed by large changes, and small changes by small changes.

The PDF meticulously details how GARCH models allow for time-varying conditional variances, crucial for financial applications. It covers various GARCH specifications, estimation techniques, and diagnostic tests. Understanding GARCH is vital for risk management, option pricing, and accurately modeling asset returns, providing a nuanced view of financial market dynamics.

Spectral Analysis and the Periodogram

Hamilton’s treatment of spectral analysis introduces techniques for examining the frequency content of time series data. The PDF explains how the periodogram, a fundamental tool, estimates the spectral density function, revealing dominant cyclical patterns within the data.

This approach allows analysts to identify periodicities that might be obscured in the time domain. The text details smoothing techniques to improve periodogram estimates and discusses the limitations of spectral methods. It’s essential for understanding underlying cycles in economic, financial, and signal processing applications.

Practical Applications of Time Series Analysis

Hamilton’s PDF showcases diverse applications, including financial forecasting, economic modeling, and signal processing, demonstrating the power of time series techniques in real-world scenarios.

Financial Forecasting

Hamilton’s approach to time series analysis, detailed within the PDF, is exceptionally valuable for financial forecasting. The methodologies presented enable the prediction of stock prices, volatility, and economic indicators.

Techniques like ARIMA models, GARCH models (covered in advanced sections), and spectral analysis allow analysts to identify patterns and trends in financial data. These models help assess risk, optimize investment strategies, and ultimately, improve financial decision-making. The book’s rigorous mathematical framework provides a solid basis for building and validating forecasting models, crucial for navigating complex financial markets.

Economic Modeling

Hamilton’s time series analysis, as presented in the PDF, provides powerful tools for constructing and analyzing economic models. These models can simulate and forecast macroeconomic variables like GDP, inflation, and unemployment rates.

The book’s emphasis on stationarity, autocorrelation, and spectral analysis allows economists to identify underlying economic cycles and relationships. State-space models, also detailed within, are particularly useful for representing complex economic systems. By applying these techniques, economists can better understand economic dynamics and inform policy decisions, leading to more effective economic management.

Signal Processing

Hamilton’s work, accessible through the PDF, equips engineers with the analytical framework for processing various signals. Spectral analysis and the periodogram, key concepts detailed within, are crucial for identifying frequencies and patterns in signals like audio, images, and sensor data.

Understanding autocorrelation and partial autocorrelation functions (ACF & PACF) aids in filtering noise and extracting meaningful information. Furthermore, the book’s coverage of state-space models provides a robust method for representing and analyzing dynamic systems, essential for advanced signal processing applications.

Resources and Further Learning

Access Hamilton’s time series analysis PDF alongside online courses and related textbooks like Shumway & Stoffer’s manual for deeper understanding.

Accessing the Hamilton Time Series Analysis PDF

Finding Hamilton’s seminal work on time series analysis in PDF format requires diligent searching. While a direct official link isn’t readily available, numerous university course websites and online repositories often host copies for academic purposes.

Researchers and students frequently share the PDF through academic networks. Be mindful of copyright restrictions and ensure responsible access. Exploring online forums dedicated to econometrics and statistical modeling can also yield valuable leads. Remember to verify the source’s legitimacy before downloading to avoid potentially harmful files.

Consider utilizing library resources as well.

Online Courses and Tutorials

Supplementing Hamilton’s text with online resources enhances learning. Platforms like Coursera, edX, and Udacity offer courses covering time series analysis, often building upon the foundational concepts presented in the PDF.

YouTube provides a wealth of tutorials, ranging from introductory explanations to advanced modeling techniques. Khan Academy also offers relevant statistical content. These resources often demonstrate practical applications using software like R and Python. Seek out courses specifically referencing Hamilton’s approach for a cohesive learning experience.

Interactive exercises solidify understanding.

Related Time Series Textbooks and Materials

Alongside Hamilton’s “Time Series Analysis,” several complementary texts deepen understanding. Shumway and Stoffer’s “Time Series Analysis and Its Applications” provides a practical approach, often used in conjunction with Hamilton’s more theoretical framework.

.

Limitations and Considerations

Hamilton’s analysis relies on data quality; preprocessing is crucial. Model validation and diagnostics are essential to avoid misleading forecasts and ensure reliable results.

Data Quality and Preprocessing

Hamilton’s approach to time series analysis heavily emphasizes the importance of meticulous data preparation. Raw data often contains inconsistencies, missing values, or outliers that can significantly distort analytical results. Therefore, thorough preprocessing is paramount. This includes handling missing data through imputation techniques, identifying and mitigating outliers, and ensuring data accuracy.

Furthermore, understanding the data generation process and potential sources of error is crucial. Data transformations, such as differencing or logarithmic scaling, may be necessary to achieve stationarity, a fundamental assumption for many time series models. Careful consideration of these steps ensures the reliability and validity of subsequent analyses.

Model Validation and Diagnostics

Hamilton’s text underscores that model building is only half the battle; rigorous validation and diagnostic checking are essential. After fitting a time series model, assessing its adequacy is critical. This involves examining residual plots for patterns indicative of model misspecification – non-randomness suggests the model hasn’t captured all the underlying structure.

Furthermore, statistical tests like the Ljung-Box test help determine if autocorrelations in the residuals are significant. Out-of-sample forecasting performance provides a practical assessment of the model’s predictive power. Proper diagnostics ensure the model is robust and reliable for making informed predictions.

Software Tools for Time Series Analysis

R and Python offer powerful packages for implementing time series techniques detailed in Hamilton’s work, facilitating practical application and analysis of sequential data.

R Packages for Time Series

R boasts a rich ecosystem of packages specifically designed for time series analysis, complementing the theoretical framework presented in Hamilton’s textbook. Key packages include ‘stats’ for foundational methods, ‘forecast’ for ARIMA modeling and forecasting, and ‘tseries’ offering various tests for stationarity and autocorrelation.

Furthermore, ‘xts’ and ‘zoo’ provide robust tools for handling and manipulating time-based data, while ‘ggplot2’ enables effective visualization of time series patterns. These resources empower users to translate Hamilton’s concepts into practical applications, facilitating in-depth exploration and analysis of sequential data.

Python Libraries for Time Series

Python offers powerful libraries for time series analysis, providing alternatives and complements to the methods detailed in Hamilton’s textbook. ‘Statsmodels’ is a cornerstone, offering comprehensive statistical modeling, including ARIMA and state-space models. ‘Pandas’ excels at data manipulation and time series indexing, while ‘NumPy’ provides essential numerical computation capabilities.

Additionally, ‘Scikit-learn’ integrates machine learning algorithms for forecasting, and ‘Matplotlib’ and ‘Seaborn’ facilitate insightful visualizations. These tools enable practitioners to implement and extend Hamilton’s theoretical insights, fostering practical applications in diverse fields.

the monster overhaul pdf

The Monster Overhaul PDF: A Comprehensive Guide

The Monster Overhaul is a remarkable GM toolbox, boasting 200 creature entries designed to inspire dynamic encounters and recontextualize familiar foes.

This guide enhances campaign worlds with improv-friendly tables, offering a non-linear exploration of monster design and a truly unique gaming experience.

It’s a resource celebrated for subverting expectations and teaching GMs how to continually expand their monster creation capabilities beyond published content.

What is The Monster Overhaul?

The Monster Overhaul isn’t simply another monster manual; it’s a meticulously crafted resource designed to fundamentally shift how Game Masters approach creature design and implementation within their tabletop role-playing games.

This comprehensive guide, available as a PDF, contains 200 unique creature entries, but its true strength lies in its focus on inspiring creativity and subverting player expectations. It encourages GMs to move beyond stat blocks and consider the narrative context of each monster.

The book actively teaches readers how to create compelling encounters, offering tools and techniques for recontextualizing existing monsters and generating entirely new ones. It’s a toolbox packed with resources for fast, dynamic gameplay, and is lauded for its ability to elevate any campaign world.

It’s a resource that continues to give long after the tables and suggestions are exhausted.

Core Design Philosophy: Subverting Expectations

The Monster Overhaul’s central design philosophy revolves around actively challenging conventional monster tropes and player assumptions. It’s not about presenting a list of creatures, but about prompting GMs to question why monsters are the way they are and how they can be made more surprising and engaging.

Every page is intentionally designed to make the reader think critically about monsters, encouraging recontextualization and innovative approaches to encounter design. This means taking familiar creatures – even something as iconic as a grue – and twisting them into something unexpected, like an elemental hedgehog.

The PDF encourages a mindset of playful disruption, aiming to create memorable moments and prevent players from falling into predictable patterns. It’s about fostering a sense of wonder and genuine threat, achieved through clever design and a willingness to break the mold;

The Book as a GM Toolbox

The Monster Overhaul functions as an expansive GM toolbox, providing a wealth of resources beyond a traditional monster manual. It’s packed with 200 creature entries, but more importantly, it’s filled with improv-friendly tables and practical design guidance for crafting fast-paced, dynamic encounters.

This isn’t a book meant to be read cover-to-cover; instead, it’s designed for random page flip-throughs, sparking inspiration and encouraging non-linear exploration of ideas. Dungeon Masters will find plenty of usable resources to enhance their campaign worlds and breathe new life into existing creatures.

The PDF empowers GMs to become active designers, offering tools to adapt creatures to different settings and consistently deliver unexpected challenges for their players, fostering a more creative and engaging tabletop experience.

Content Overview

The Monster Overhaul PDF delivers 200 creature entries, dynamic improv tables, and unique elemental variations, offering a comprehensive resource for game masters.

200 Creature Entries

The Monster Overhaul doesn’t simply present a list of monsters; it provides a vast bestiary of 200 creatures, each meticulously designed to spark creativity. These aren’t just stat blocks, but starting points for reimagining classic monsters or crafting entirely new horrors.

The book encourages GMs to move beyond traditional monster tropes, prompting them to consider how creatures fit into their specific campaign worlds and how to subvert player expectations. Each entry is a springboard for improvisation, offering suggestions for variations, behaviors, and ecological roles.

This extensive collection ensures that GMs have a wealth of options at their fingertips, reducing reliance on pre-packaged adventures and fostering a more dynamic and personalized gaming experience. It’s a toolbox brimming with potential, ready to be tailored to any campaign setting.

Improv-Friendly Tables for Dynamic Encounters

The Monster Overhaul truly shines with its inclusion of improv-friendly tables, designed to inject spontaneity and unpredictability into gameplay. These tables aren’t restrictive; they’re catalysts for creativity, offering suggestions for monster behaviors, environmental effects, and unexpected twists during encounters.

Rather than relying on pre-planned scenarios, GMs can use these tables to react to player actions and create truly dynamic experiences. This fosters a more collaborative storytelling environment, where the game feels less scripted and more responsive.

The book is intentionally built for random page flip-throughs, encouraging GMs to embrace the unexpected and weave surprising elements into their campaigns. These tables are a core component of the book’s design philosophy, promoting adaptability and on-the-fly worldbuilding.

Elemental Creatures and Unique Variations

The Monster Overhaul doesn’t simply present standard elemental creatures; it delves into unique variations, pushing beyond typical fire, water, earth, and air tropes. The book explores how elemental forces can manifest in unexpected and imaginative ways, offering GMs a wealth of options for populating their worlds.

Interestingly, the text notes the potential for “elemental hedgehogs,” illustrating the book’s willingness to embrace quirky and unconventional concepts. This approach encourages GMs to think outside the box and create truly memorable encounters.

The inclusion of these variations, listed within the Elemental section, demonstrates a commitment to providing resources that inspire creativity and subvert player expectations, making even familiar elements feel fresh and dangerous.

Key Features & Benefits

The Monster Overhaul provides 200 creatures, improv tables, and design tools for dynamic encounters, enhancing campaign worlds and inspiring GM creativity significantly.

Enhancing Campaign Worlds

The Monster Overhaul isn’t simply a collection of monsters; it’s a catalyst for breathing new life into existing campaign settings. The book’s core philosophy centers around recontextualization, prompting Game Masters to consider how creatures can be adapted and integrated into their unique worlds in unexpected ways.

This resource provides plenty of usable tools to enrich any campaign, moving beyond simple stat blocks to offer inspiration for ecology, behavior, and lore. The emphasis on improv-friendly tables encourages spontaneous world-building, allowing GMs to seamlessly weave creatures into ongoing narratives.

By subverting player expectations and offering unique variations on classic monsters, The Monster Overhaul empowers GMs to create truly memorable and immersive gaming experiences, transforming familiar landscapes into unpredictable and exciting realms.

Random Page Flip Throughs & Non-Linear Exploration

The Monster Overhaul is deliberately designed to resist traditional, cover-to-cover reading. Instead, it thrives on random page flips, encouraging a non-linear approach to discovery and inspiration. This unique structure mirrors the unpredictable nature of gameplay itself, fostering creativity and spontaneity.

The book’s layout and content are optimized for quick access to usable resources, allowing GMs to instantly find intriguing creatures, evocative descriptions, or helpful improv tables. This method promotes a dynamic brainstorming process, sparking unexpected connections and innovative encounter ideas.

Rather than presenting a rigid bestiary, The Monster Overhaul functions as a toolkit, inviting GMs to assemble and customize monsters on the fly, resulting in a truly personalized and engaging gaming experience.

Focus on Monster Design & Recontextualization

The Monster Overhaul isn’t simply a collection of creatures; it’s a masterclass in monster design. Every page is crafted to prompt GMs to think critically about monsters – how to make them feel fresh, how to reimagine them, or how to deliberately subvert player expectations.

The book excels at recontextualization, offering tools and suggestions to breathe new life into classic monsters. It encourages GMs to move beyond stat blocks and consider the ecological role, motivations, and unique quirks of each creature.

This focus extends beyond individual monsters, teaching readers how to continue designing and adapting creatures long after consulting the published tables, fostering a lasting impact on their game mastering skills.

How to Use The Monster Overhaul Effectively

The Monster Overhaul thrives on random page flips, offering a non-traditional approach beyond a standard monster manual for dynamic gameplay and adaptable campaigns.

Beyond a Traditional Monster Manual

The Monster Overhaul deliberately moves away from the typical “stat block” focused monster manual format. It isn’t simply a collection of creatures with pre-defined abilities; instead, it functions as a catalyst for creating monsters.

The book encourages Game Masters to think critically about monster design, recontextualization, and subverting player expectations. Rather than providing definitive answers, it equips GMs with tools – like improv tables – to generate unique encounters on the fly.

This approach fosters a more organic and unpredictable gaming experience, moving beyond rote memorization of stats and abilities. It’s about understanding why a monster exists and how it fits into the campaign world, not just what it can do. The index is present, but secondary to the intended exploratory nature of the book.

Essentially, it’s a guide to monster-making, not just a monster list.

Utilizing Improv Tables During Gameplay

The Monster Overhaul truly shines when leveraging its extensive improv-friendly tables during active gameplay. These tables aren’t meant to be exhaustive, but rather springboards for spontaneous monster creation and encounter design.

Instead of rigidly adhering to pre-planned encounters, GMs can use the tables to quickly generate unique monster traits, motivations, or environmental quirks on the fly. This fosters a dynamic and unpredictable experience for players.

The book is specifically designed for “random page flip throughs,” encouraging GMs to embrace serendipity and incorporate unexpected elements into their campaigns. This method allows for fast, dynamic encounters, and ensures that no two sessions are ever quite the same.

These tables empower GMs to react to player actions and create truly memorable moments.

Adapting Creatures to Different Campaign Settings

The Monster Overhaul isn’t tied to any specific campaign setting, making its creatures incredibly versatile for adaptation. The book’s focus on monster design and recontextualization provides GMs with the tools to seamlessly integrate these beings into any world.

Rather than simply dropping monsters into a setting, the book encourages GMs to consider why a creature exists within that environment. This might involve altering its ecology, motivations, or even its physical appearance to better fit the lore.

The elemental variations, in particular, offer a fantastic starting point for adapting creatures to diverse environments, from scorching deserts to frozen wastelands. This flexibility enhances campaign worlds and provides a fresh perspective on familiar monsters.

It’s about making the monster feel native to the setting.

Community Reception & Awards

The Monster Overhaul was recognized as a top RPG supplement of 2023, gaining praise on Reddit (r/osr), EN World, and Domain of Many Things.

Reviewers highlight its innovative approach to monster design and its value as an exceptional GM toolbox for dynamic gameplay.

Recognized as a Top RPG Supplement of 2023

The Monster Overhaul quickly garnered significant acclaim following its release, being lauded as one of the best RPG supplements of 2023 by numerous online communities and reviewers.

Coins and Scrolls specifically declared it the “Best RPG of 2023,” emphasizing its ability to inspire creative thinking about monsters and encourage innovative recontextualization of classic creatures.

This recognition stems from the book’s unique design, which isn’t simply a collection of stats, but a guide to understanding why monsters work and how to make them truly memorable.

The supplement’s focus on subverting player expectations and providing tools for improvisation resonated deeply with game masters seeking to elevate their campaigns beyond traditional monster encounters.

This award-winning approach has cemented The Monster Overhaul’s place as a must-have resource for tabletop RPG enthusiasts.

Discussion on Reddit (r/osr)

The Monster Overhaul sparked considerable discussion within the r/osr (Old School Renaissance) subreddit community upon its release and subsequent print availability from IndiePress.

Redditors praised the book’s innovative approach to monster design, noting its emphasis on recontextualization and subverting player expectations – core tenets of the OSR philosophy.

Conversations centered around the potential for using the improv-friendly tables to create truly dynamic and unpredictable encounters, moving beyond static monster stats.

Users shared examples of how they adapted creatures from The Monster Overhaul to fit their existing campaign settings, highlighting its versatility and broad applicability.

The playful debate regarding the inclusion of “elemental grues” – a nod to the classic text adventure Zork – also generated significant engagement and demonstrated the book’s ability to inspire creative interpretations.

Reviews on EN World and Domain of Many Things

The Monster Overhaul received positive attention from prominent tabletop RPG review sites, EN World and Domain of Many Things, solidifying its reputation as a valuable resource for Game Masters.

EN World’s review emphasized the book’s utility in enhancing campaign worlds, noting its wealth of usable resources and suitability for random page flip-throughs, rather than strict cover-to-cover reading.

Domain of Many Things hailed The Monster Overhaul as more than just a monster manual, positioning it as a comprehensive GM toolbox packed with 200 creatures and practical design tools.

Reviewers consistently highlighted the book’s focus on fast, dynamic encounters and its ability to inspire creativity in monster design and adaptation.

Both sites agreed that Skerples’ work is a “must-have” for TTRPG game masters seeking to elevate their game with innovative and engaging monster encounters.